This document provides introductory information on how DNSSEC works, how
to configure BIND 9 to support some common DNSSEC features, and
some basic troubleshooting tips. The chapters are organized as follows:
Introduction covers the intended audience for this
document, assumed background knowledge, and a basic introduction to the
topic of DNSSEC.
Getting Started covers various requirements
before implementing DNSSEC, such as software versions, hardware
capacity, network requirements, and security changes.
Validation walks through setting up a validating
resolver, and gives both more information on the validation process and
some examples of tools to verify that the resolver is properly validating
answers.
Signing explains how to set up a basic signed
authoritative zone, details the relationship between a child and a parent zone,
and discusses ongoing maintenance tasks.
Thanks to the following individuals (in no particular order) who have
helped in completing this document: Jeremy C. Reed, Heidi Schempf,
Stephen Morris, Jeff Osborn, Vicky Risk, Jim Martin, Evan Hunt, Mark
Andrews, Michael McNally, Kelli Blucher, Chuck Aurora, Francis Dupont,
Rob Nagy, Ray Bellis, Matthijs Mekking, and Suzanne Goldlust.
Special thanks goes to Cricket Liu and Matt Larson for their
selflessness in knowledge sharing.
Thanks to all the reviewers and contributors, including John Allen, Jim
Young, Tony Finch, Timothe Litt, and Dr. Jeffry A. Spain.
The sections on key rollover and key timing metadata borrowed heavily
from the Internet Engineering Task Force draft titled “DNSSEC Key Timing
Considerations” by S. Morris, J. Ihren, J. Dickinson, and W. Mekking,
subsequently published as RFC 7583.
This guide is intended as an introduction to DNSSEC for the DNS
administrator who is already comfortable working with the existing BIND and DNS
infrastructure. He or she might be curious about DNSSEC, but may not have had the
time to investigate DNSSEC, to learn whether DNSSEC should
be a part of his or her environment, and understand what it means to deploy it in the
field.
This guide provides basic information on how to configure DNSSEC using
BIND 9.16.9 or later. Most of the information and examples in this guide also
apply to versions of BIND later than 9.9.0, but some of the key features described here
were only introduced in version 9.16.9. Readers are assumed to have basic
working knowledge of the Domain Name System (DNS) and related network
infrastructure, such as concepts of TCP/IP. In-depth knowledge of DNS and
TCP/IP is not required. The guide assumes no prior knowledge of DNSSEC or
related technology such as public key cryptography.
If you are already operating a DNSSEC-signed zone, you may not learn
much from the first half of this document, and you may want to start with
Advanced Discussions. If you want to
learn about details of the protocol extension, such as data fields and flags,
or the new record types, this document can help you get started but it
does not include all the technical details.
If you are experienced in DNSSEC, you
may find some of the concepts in this document to be overly simplified for
your taste, and some details are intentionally omitted at times for ease of
illustration.
If you administer a large or complex BIND environment, this
guide may not provide enough information for you, as it is intended to provide
only basic, generic working examples.
If you are a top-level domain (TLD) operator, or
administer zones under signed TLDs, this guide can
help you get started, but it does not provide enough details to serve all of your
needs.
If your DNS environment uses DNS products other than (or in addition to)
BIND, this document may provide some background or overlapping information, but you
should check each product’s vendor documentation for specifics.
Finally, deploying
DNSSEC on internal or private networks is not covered in this document, with the
exception of a brief discussion in DNSSEC on Private Networks.
The Domain Name System (DNS) was designed in a day and age when the
Internet was a friendly and trusting place. The protocol itself provides
little protection against malicious or forged answers. DNS Security
Extensions (DNSSEC) addresses this need, by adding digital signatures
into DNS data so that each DNS response can be verified for integrity
(the answer did not change during transit) and authenticity (the data
came from the true source, not an impostor). In the ideal world, when
DNSSEC is fully deployed, every single DNS answer can be validated and
trusted.
DNSSEC does not provide a secure tunnel; it does not encrypt or hide DNS
data. It operates independently of an existing Public Key Infrastructure
(PKI). It does not need SSL certificates or shared secrets. It was
designed with backwards compatibility in mind, and can be deployed
without impacting “old” unsecured domain names.
DNSSEC is deployed on the three major components of the DNS
infrastructure:
Recursive Servers: People use recursive servers to lookup external
domain names such as www.example.com. Operators of recursive servers
need to enable DNSSEC validation. With validation enabled, recursive
servers carry out additional tasks on each DNS response they
receive to ensure its authenticity.
Authoritative Servers: People who publish DNS data on their name
servers need to sign that data. This entails creating additional
resource records, and publishing them to parent domains where
necessary. With DNSSEC enabled, authoritative servers respond to
queries with additional DNS data, such as digital signatures and
keys, in addition to the standard answers.
Applications: This component lives on every client machine, from web
servers to smart phones. This includes resolver libraries on different
operating systems, and applications such as web browsers.
In this guide, we focus on the first two components, Recursive
Servers and Authoritative Servers, and only lightly touch on the third
component. We look at how DNSSEC works, how to configure a
validating resolver, how to sign DNS zone data, and other operational
tasks and considerations.
Public Key Cryptography works on the concept of a pair of keys: one
made available to the world publicly, and one kept in secrecy
privately. Not surprisingly, they are known as a public key and a private
key. If you are not familiar with the concept, think of it as a
cleverly designed lock, where one key locks and one key unlocks. In
DNSSEC, we give out the unlocking public key to the rest of the
world, while keeping the locking key private. To learn how this is
used to secure DNS messages, see How Are Answers Verified?.
DNSSEC introduces eight new resource record types:
RRSIG (digital resource record signature)
DNSKEY (public key)
DS (parent-child)
NSEC (proof of nonexistence)
NSEC3 (proof of nonexistence)
NSEC3PARAM (proof of nonexistence)
CDS (child-parent signaling)
CDNSKEY (child-parent signaling)
This guide does not go deep into the anatomy of each resource record
type; the details are left for the reader to research and explore.
Below is a short introduction on each of the new record types:
RRSIG: With DNSSEC enabled, just about every DNS answer (A, PTR,
MX, SOA, DNSKEY, etc.) comes with at least one resource
record signature, or RRSIG. These signatures are used by recursive name
servers, also known as validating resolvers, to verify the answers
received. To learn how digital signatures are generated and used, see
How Are Answers Verified?.
DNSKEY: DNSSEC relies on public-key cryptography for data
authenticity and integrity. There are several keys used in DNSSEC,
some private, some public. The public keys are published to the world
as part of the zone data, and they are stored in the DNSKEY record
type.
In general, keys in DNSSEC are used for one or both of the following
roles: as a Zone Signing Key (ZSK), used to protect all zone data; or
as a Key Signing Key (KSK), used to protect the zone’s keys. A key
that is used for both roles is referred to as a Combined Signing Key
(CSK). We talk about keys in more detail in
DNSSEC Keys.
DS: One of the critical components of DNSSEC is that the parent
zone can “vouch” for its child zone. The DS record is verifiable
information (generated from one of the child’s public keys) that a
parent zone publishes about its child as part of the chain of trust.
To learn more about the Chain of Trust, see
Chain of Trust.
NSEC, NSEC3, NSEC3PARAM: These resource records all deal with a
very interesting problem: proving that something does not exist. We
look at these record types in more detail in
Proof of Non-Existence (NSEC and NSEC3).
CDS, CDNSKEY: The CDS and CDNSKEY resource records apply to
operational matters and are a way to signal to the parent zone that
the DS records it holds for the child zone should be updated. This is
covered in more detail in The CDS and CDNSKEY Resource Records.
Traditional (insecure) DNS lookup is simple: a recursive name server
receives a query from a client to lookup a name like www.isc.org. The
recursive name server tracks down the authoritative name server(s)
responsible, sends the query to one of the authoritative name servers,
and waits for it to respond with the answer.
With DNSSEC validation enabled, a validating recursive name server
(a.k.a. a validating resolver) asks for additional resource
records in its query, hoping the remote authoritative name servers
respond with more than just the answer to the query, but some proof to
go along with the answer as well. If DNSSEC responses are received, the
validating resolver performs cryptographic computation to verify the
authenticity (the origin of the data) and integrity (that the data was not altered
during transit) of the answers, and even asks the parent zone as part of
the verification. It repeats this process of get-key, validate,
ask-parent, and its parent, and its parent, all the way until
the validating resolver reaches a key that it trusts. In the ideal,
fully deployed world of DNSSEC, all validating resolvers only need to
trust one key: the root key.
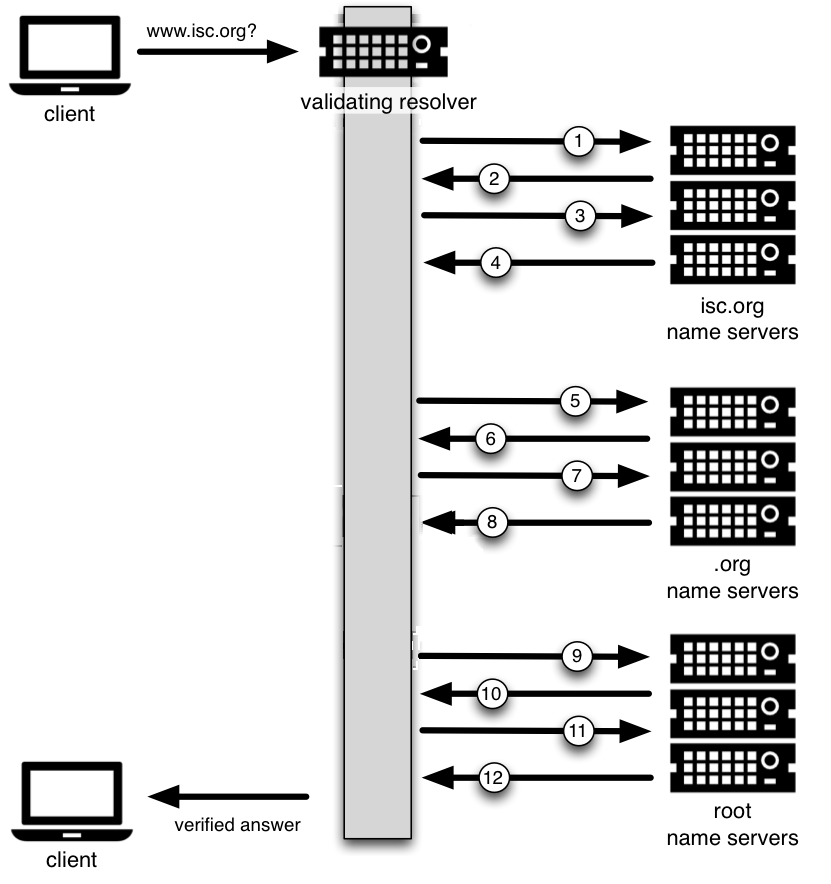
The 12-Step DNSSEC Validation Process (Simplified)
The following example shows the 12 steps of the DNSSEC validating process
at a very high level, looking up the name www.isc.org :
Upon receiving a DNS query from a client to resolve www.isc.org,
the validating resolver follows standard DNS protocol to track down
the name server for isc.org, and sends it a DNS query to ask for the
A record of www.isc.org. But since this is a DNSSEC-enabled
resolver, the outgoing query has a bit set indicating it wants
DNSSEC answers, hoping the name server that receives it is DNSSEC-enabled
and can honor this secure request.
The isc.org name server is DNSSEC-enabled, so it responds with both
the answer (in this case, an A record) and a digital signature for
verification purposes.
The validating resolver requires cryptographic keys to be able to verify the
digital signature, so it asks the isc.org name server for those keys.
The isc.org name server responds with the cryptographic keys
(and digital signatures of the keys) used to generate the digital
signature that was sent in #2. At this point, the validating
resolver can use this information to verify the answers received in
#2.
Let’s take a quick break here and look at what we’ve got so far…
how can our server trust this answer? If a clever attacker had taken over
the isc.org name server(s), of course she would send matching
keys and signatures. We need to ask someone else to have confidence
that we are really talking to the real isc.org name server. This
is a critical part of DNSSEC: at some point, the DNS administrators
at isc.org uploaded some cryptographic information to its
parent, .org, maybe through a secure web form, maybe
through an email exchange, or perhaps in person. In
any event, at some point some verifiable information about the
child (isc.org) was sent to the parent (.org) for
safekeeping.
The validating resolver asks the parent (.org) for the
verifiable information it keeps on its child, isc.org.
Verifiable information is sent from the .org server. At this
point, the validating resolver compares this to the answer it received
in #4; if the two of them match, it proves the authenticity of
isc.org.
Let’s examine this process. You might be thinking to yourself,
what if the clever attacker that took over isc.org also
compromised the .org servers? Of course all this information
would match! That’s why we turn our attention now to the
.org server, interrogate it for its cryptographic keys, and
move one level up to .org’s parent, root.
The validating resolver asks the .org authoritative name server for
its cryptographic keys, to verify the answers received in #6.
The .org name server responds with the answer (in this case,
keys and signatures). At this point, the validating resolver can
verify the answers received in #6.
The validating resolver asks root (.org’s parent) for the verifiable
information it keeps on its child, .org.
The root name server sends back the verifiable information it keeps
on .org. The validating resolver uses this information
to verify the answers received in #8.
So at this point, both isc.org and .org check out. But
what about root? What if this attacker is really clever and somehow
tricked us into thinking she’s the root name server? Of course she
would send us all matching information! So we repeat the
interrogation process and ask for the keys from the root name
server.
The validating resolver asks the root name server for its cryptographic
keys to verify the answer(s) received in #10.
The root name server sends its keys; at this point, the validating
resolver can verify the answer(s) received in #10.
But what about the root server itself? Who do we go to verify root’s
keys? There’s no parent zone for root. In security, you have to trust
someone, and in the perfectly protected world of DNSSEC (we talk later
about the current imperfect state and ways to work around it),
each validating resolver would only have to trust one entity, that is,
the root name server. The validating resolver already has the root key
on file (we discuss later how we got the root key file). So
after the answer in #12 is received, the validating resolver compares it
to the key it already has on file. Providing one of the keys in the
answer matches the one on file, we can trust the answer from root. Thus
we can trust .org, and thus we can trust isc.org. This is known
as the “chain of trust” in DNSSEC.
You might be thinking to yourself: all this DNSSEC stuff sounds
wonderful, but why should I care? Below are some reasons why you may
want to consider deploying DNSSEC:
Being a good netizen: By enabling DNSSEC validation (as described in
Validation) on your DNS servers, you’re protecting
your users and yourself a little more by checking answers returned to
you; by signing your zones (as described in
Signing), you are making it possible for other
people to verify your zone data. As more people adopt DNSSEC, the
Internet as a whole becomes more secure for everyone.
Compliance: You may not even get a say in
implementing DNSSEC, if your organization is subject to compliance
standards that mandate it. For example, the US government set a
deadline in 2008 to have all .gov subdomains signed by
December 2009. [1] So if you operate a subdomain in .gov, you
must implement DNSSEC to be compliant. ICANN also requires
that all new top-level domains support DNSSEC.
Enhanced Security: Okay, so the big lofty goal of “let’s be good”
doesn’t appeal to you, and you don’t have any compliance standards to
worry about. Here is a more practical reason why you should consider
DNSSEC: in the event of a DNS-based security breach, such as cache
poisoning or domain hijacking, after all the financial and brand
damage done to your domain name, you might be placed under scrutiny
for any preventive measure that could have been put in place. Think
of this like having your website only available via HTTP but not
HTTPS.
New Features: DNSSEC brings not only enhanced security, but also
a whole new suite of features. Once DNS
can be trusted completely, it becomes possible to publish SSL
certificates in DNS, or PGP keys for fully automatic cross-platform
email encryption, or SSH fingerprints…. New features are still
being developed, but they all rely on a trustworthy DNS
infrastructure. To take a peek at these next-generation DNS features,
check out Introduction to DANE.
How Does DNSSEC Change My Job as a DNS Administrator?
With this protocol extension, some of the things you were used to in DNS
have changed. As the DNS administrator, you have new maintenance
tasks to perform on a regular basis (as described in
Maintenance Tasks); when there is a DNS resolution
problem, you have new troubleshooting techniques and tools to use (as
described in Basic DNSSEC Troubleshooting). BIND 9 tries its best to
make these things as transparent and seamless as possible. In this
guide, we try to use configuration examples that result in the least
amount of work for BIND 9 DNS administrators.
Enabling DNSSEC validation on a recursive server makes it a validating
resolver. The job of a validating resolver is to fetch additional
information that can be used to computationally verify the answer set.
Contrary to popular belief, the increase in resource consumption is very modest:
CPU: a validating resolver executes cryptographic functions on cache-miss
answers, which leads to increased CPU usage. Thanks to standard DNS caching
and contemporary CPUs, the increase in CPU-time consumption in a steady
state is negligible - typically on the order of 5%. For a brief period (a few
minutes) after the resolver starts, the increase might be as much as 20%, but it
quickly decreases as the DNS cache fills in.
System memory: DNSSEC leads to larger answer sets and occupies
more memory space. With typical ISP traffic and the state of the Internet as
of mid-2022, memory consumption for the cache increases by roughly 20%.
Network interfaces: although DNSSEC does increase the amount of DNS
traffic overall, in practice this increase is often within measurement
error.
On the authoritative server side, DNSSEC is enabled on a zone-by-zone
basis. When a zone is DNSSEC-enabled, it is also known as “signed.”
Below are the expected changes to resource consumption caused by serving
DNSSEC-signed zones:
CPU: a DNSSEC-signed zone requires periodic re-signing, which is a
cryptographic function that is CPU-intensive. If your DNS zone is
dynamic or changes frequently, that also adds to higher CPU loads.
System storage: A signed zone is definitely larger than an unsigned
zone. How much larger? See
Your Zone, Before and After DNSSEC for a comparison
example. The final size depends on the structure of the zone, the signing algorithm,
the number of keys, the choice of NSEC or NSEC3, the ratio of signed delegations, the zone file
format, etc. Usually, the size of a signed zone ranges from a negligible
increase to as much as three times the size of the unsigned zone.
System memory: Larger DNS zone files take up not only more storage
space on the file system, but also more space when they are loaded
into system memory. The final memory consumption also depends on all the
variables listed above: in the typical case the increase is around half of
the unsigned zone memory consumption, but it can be as high as three times
for some corner cases.
Network interfaces: While your authoritative name servers will
begin sending back larger responses, it is unlikely that you need to
upgrade your network interface card (NIC) on the name server unless
you have some truly outdated hardware.
One factor to consider, but over which you really have no control, is
the number of users who query your domain name who themselves have DNSSEC
enabled. As of mid-2022, measurements by APNIC show 41% of Internet users send
DNSSEC-aware queries. This means that more DNS queries for your domain will
take advantage of the additional security features, which will result in
increased system load and possibly network traffic.
From a network perspective, DNS and DNSSEC packets are very similar;
DNSSEC packets are just bigger, which means DNS is more likely to use
TCP. You should test for the following two items to make sure your
network is ready for DNSSEC:
DNS over TCP: Verify network connectivity over TCP port 53, which
may mean updating firewall policies or Access Control Lists (ACL) on
routers. See Wait… DNS Uses TCP? for more details.
Large UDP packets: Some network equipment, such as firewalls, may
make assumptions about the size of DNS UDP packets and incorrectly
reject DNS traffic that appears “too big.” Verify that the
responses your name server generates are being seen by the rest of the
world: see What’s EDNS All About (And Why Should I Care)? for more details.
Before starting your DNSSEC deployment, check with your parent zone
administrators to make sure they support DNSSEC. This may or may not be
the same entity as your registrar. As you will see later in
Working With the Parent Zone, a crucial step in DNSSEC deployment
is establishing the parent-child trust relationship. If your parent zone
does not yet support DNSSEC, contact that administrator to voice your concerns.
Some organizations may be subject to stricter security requirements than
others. Check to see if your organization requires stronger
cryptographic keys be generated and stored, and how often keys need to be
rotated. The examples presented in this document are not intended for
high-value zones. We cover some of these security considerations in
Advanced Discussions.
This section provides the basic information needed to set up a
working DNSSEC-aware recursive server, also known as a validating
resolver. A validating resolver performs validation for each remote
response received, following the chain of trust to verify that the answers it
receives are legitimate, through the use of public key cryptography and
hashing functions.
So how do we turn on DNSSEC validation? It turns out that you may not need
to reconfigure your name server at all, since the most recent versions of BIND 9 -
including packages and distributions - have shipped with DNSSEC validation
enabled by default. Before making any configuration changes, check
whether you already have DNSSEC validation enabled by following the steps
described in So You Think You Are Validating (How To Test A Recursive Server).
In earlier versions of BIND, including 9.11-ESV, DNSSEC
validation must be explicitly enabled. To do this, you only need to
add one line to the options section of your configuration file:
options{...dnssec-validationauto;...};
Restart named or run rndcreconfig, and your recursive server is
now happily validating each DNS response. If this does not work for you,
you may have some other network-related configurations that need to be
adjusted. Take a look at Network Requirements to make sure your network
is ready for DNSSEC.
Once DNSSEC validation is enabled, any DNS response that does not pass
the validation checks results in a failure to resolve the domain name
(often a SERVFAIL status seen by the client). If everything has
been configured properly, this is the correct result; it means that an end user has
been protected against a malicious attack.
However, if there is a DNSSEC configuration issue (sometimes outside of
the administrator’s control), a specific name or sometimes entire
domains may “disappear” from the DNS, and become unreachable
through that resolver. For the end user, the issue may manifest itself
as name resolution being slow or failing altogether; some parts of a URL
not loading; or the web browser returning an error message indicating
that the page cannot be displayed. For example, if root name
servers were misconfigured with the wrong information about .org, it
could cause all validation for .org domains to fail. To end
users, it would appear that all .org web sites were out of service.
[2] Should you encounter DNSSEC-related problems, don’t
be tempted to disable validation; there is almost certainly a solution
that leaves validation enabled. A basic troubleshooting guide can be
found in Basic DNSSEC Troubleshooting.
So You Think You Are Validating (How To Test A Recursive Server)
Now that you have reconfigured your recursive server and
restarted it, how do you know that your recursive name server is
actually verifying each DNS query? There are several ways to check, and
we’ve listed a few of them below.
For most people, the simplest way to check if a recursive name server
is indeed validating DNS queries is to use one of the many web-based
tools available.
Configure your client computer to use the newly reconfigured recursive
server for DNS resolution; then use one of these web-based tests to
confirm that it is in fact validating DNS responses.
Web-based DNSSEC-verification tools often employ JavaScript. If you don’t trust the
JavaScript magic that the web-based tools rely on, you can take matters
into your own hands and use a command-line DNS tool to check your
validating resolver yourself.
While nslookup is popular, partly because it comes pre-installed on
most systems, it is not DNSSEC-aware. dig, on the other hand, fully
supports the DNSSEC standard and comes as a part of BIND. If you do not
have dig already installed on your system, install it by downloading
it from ISC’s website. ISC provides pre-compiled
Windows versions on its website.
dig is a flexible tool for interrogating DNS name servers. It
performs DNS lookups and displays the answers that are returned from the
name servers that were queried. Most seasoned DNS administrators use
dig to troubleshoot DNS problems because of its flexibility, ease of
use, and clarity of output.
The example below shows how to use dig to query the name server 10.53.0.1
for the A record for ftp.isc.org when DNSSEC validation is enabled
(i.e. the default). The address 10.53.0.1 is only used as an example;
replace it with the actual address or host name of your
recursive name server.
$ dig @10.53.0.1 ftp.isc.org. A +dnssec +multiline

; <<>> DiG 9.16.0 <<>> @10.53.0.1 ftp.isc.org a +dnssec +multiline
; (1 server found)
;; global options: +cmd
;; Got answer:
;; ->>HEADER<<- opcode: QUERY, status: NOERROR, id: 48742
;; flags: qr rd ra ad; QUERY: 1, ANSWER: 2, AUTHORITY: 0, ADDITIONAL: 1

;; OPT PSEUDOSECTION:
; EDNS: version: 0, flags: do; udp: 4096
; COOKIE: 29a9705c2160b08c010000005e67a4a102b9ae079c1b24c8 (good)
;; QUESTION SECTION:
;ftp.isc.org.       IN A

;; ANSWER SECTION:
ftp.isc.org.        300 IN A 149.20.1.49
ftp.isc.org.        300 IN RRSIG A 13 3 300 (
                20200401191851 20200302184340 27566 isc.org.
                e9Vkb6/6aHMQk/t23Im71ioiDUhB06sncsduoW9+Asl4
                L3TZtpLvZ5+zudTJC2coI4D/D9AXte1cD6FV6iS6PQ== )

;; Query time: 452 msec
;; SERVER: 10.53.0.1#53(10.53.0.1)
;; WHEN: Tue Mar 10 14:30:57 GMT 2020
;; MSG SIZE  rcvd: 187
The important detail in this output is the presence of the ad flag
in the header. This signifies that BIND has retrieved all related DNSSEC
information related to the target of the query (ftp.isc.org) and that
the answer received has passed the validation process described in
How Are Answers Verified?. We can have confidence in the
authenticity and integrity of the answer, that ftp.isc.org really
points to the IP address 149.20.1.49, and that it was not a spoofed answer
from a clever attacker.
Unlike earlier versions of BIND, the current versions of BIND always
request DNSSEC records (by setting the do bit in the query they make
to upstream servers), regardless of DNSSEC settings. However, with
validation disabled, the returned signature is not checked. This can be
seen by explicitly disabling DNSSEC validation. To do this, add the line
dnssec-validationno; to the “options” section of the configuration
file, i.e.:
options{...dnssec-validationno;...};
If the server is restarted (to ensure a clean cache) and the same
dig command executed, the result is very similar:
$ dig @10.53.0.1 ftp.isc.org. A +dnssec +multiline

; <<>> DiG 9.16.0 <<>> @10.53.0.1 ftp.isc.org a +dnssec +multiline
; (1 server found)
;; global options: +cmd
;; Got answer:
;; ->>HEADER<<- opcode: QUERY, status: NOERROR, id: 39050
;; flags: qr rd ra; QUERY: 1, ANSWER: 2, AUTHORITY: 0, ADDITIONAL: 1

;; OPT PSEUDOSECTION:
; EDNS: version: 0, flags: do; udp: 4096
; COOKIE: a8dc9d1b9ec45e75010000005e67a8a69399741fdbe126f2 (good)
;; QUESTION SECTION:
;ftp.isc.org.       IN A

;; ANSWER SECTION:
ftp.isc.org.        300 IN A 149.20.1.49
ftp.isc.org.        300 IN RRSIG A 13 3 300 (
                20200401191851 20200302184340 27566 isc.org.
                e9Vkb6/6aHMQk/t23Im71ioiDUhB06sncsduoW9+Asl4
                L3TZtpLvZ5+zudTJC2coI4D/D9AXte1cD6FV6iS6PQ== )

;; Query time: 261 msec
;; SERVER: 10.53.0.1#53(10.53.0.1)
;; WHEN: Tue Mar 10 14:48:06 GMT 2020
;; MSG SIZE  rcvd: 187
However, this time there is no ad flag in the header. Although
dig is still returning the DNSSEC-related resource records, it is
not checking them, and thus cannot vouch for the authenticity of the answer.
If you do carry out this test, remember to re-enable DNSSEC validation
(by removing the dnssec-validationno; line from the configuration
file) before continuing.
It is also important to make sure that DNSSEC is protecting your network from
domain names that fail to validate; such failures could be caused by
attacks on your system, attempting to get it to accept false DNS
information. Validation could fail for a number of reasons: maybe the
answer doesn’t verify because it’s a spoofed response; maybe the
signature was a replayed network attack that has expired; or maybe the
child zone has been compromised along with its keys, and the parent
zone’s information tells us that things don’t add up. There is a
domain name specifically set up to fail DNSSEC validation,
www.dnssec-failed.org.
With DNSSEC validation enabled (the default), an attempt to look up that
name fails:
On the other hand, if DNSSEC validation is disabled (by adding the
statement dnssec-validationno; to the options clause in the
configuration file), the lookup succeeds:
$ dig @10.53.0.1 www.dnssec-failed.org. A

; <<>> DiG 9.16.0 <<>> @10.53.0.1 www.dnssec-failed.org. A
; (1 server found)
;; global options: +cmd
;; Got answer:
;; ->>HEADER<<- opcode: QUERY, status: NOERROR, id: 54704
;; flags: qr rd ra; QUERY: 1, ANSWER: 2, AUTHORITY: 0, ADDITIONAL: 1

;; OPT PSEUDOSECTION:
; EDNS: version: 0, flags:; udp: 4096
; COOKIE: 251eee58208917f9010000005e67bb6829f6dabc5ae6b7b9 (good)
;; QUESTION SECTION:
;www.dnssec-failed.org.     IN  A

;; ANSWER SECTION:
www.dnssec-failed.org.  7200    IN  A   68.87.109.242
www.dnssec-failed.org.  7200    IN  A   69.252.193.191

;; Query time: 439 msec
;; SERVER: 10.53.0.1#53(10.53.0.1)
;; WHEN: Tue Mar 10 16:08:08 GMT 2020
;; MSG SIZE  rcvd: 110
Do not be tempted to disable DNSSEC validation just because some names
are failing to resolve. Remember, DNSSEC protects your DNS lookup from
hacking. The next section describes how to quickly check whether
the failure to successfully look up a name is due to a validation
failure.
Since all DNSSEC validation failures result in a general SERVFAIL
message, how do we know if it was really a validation error?
Fortunately, there is a flag in dig, (“CD” for “checking
disabled”) which tells the server to disable DNSSEC validation. If
you receive a SERVFAIL message, re-run the query a second time
and set the dig+cd flag. If the query succeeds with dig+cd, but
ends in SERVFAIL without it, you know you are dealing with a
validation problem. So using the previous example of
www.dnssec-failed.org and with DNSSEC validation enabled in the
resolver:
$ dig @10.53.0.1 www.dnssec-failed.org A +cd

; <<>> DiG 9.16.0 <<>> @10.53.0.1 www.dnssec-failed.org. A +cd
; (1 server found)
;; global options: +cmd
;; Got answer:
;; ->>HEADER<<- opcode: QUERY, status: NOERROR, id: 62313
;; flags: qr rd ra cd; QUERY: 1, ANSWER: 2, AUTHORITY: 0, ADDITIONAL: 1

;; OPT PSEUDOSECTION:
; EDNS: version: 0, flags:; udp: 4096
; COOKIE: 73ca1be3a74dd2cf010000005e67c8c8e6df64b519cd87fd (good)
;; QUESTION SECTION:
;www.dnssec-failed.org.     IN  A

;; ANSWER SECTION:
www.dnssec-failed.org.  7197    IN  A   68.87.109.242
www.dnssec-failed.org.  7197    IN  A   69.252.193.191

;; Query time: 0 msec
;; SERVER: 10.53.0.1#53(10.53.0.1)
;; WHEN: Tue Mar 10 17:05:12 GMT 2020
;; MSG SIZE  rcvd: 110
In Easy-Start Guide for Recursive Servers, we used one line
of configuration to turn on DNSSEC validation: the act of chasing down
signatures and keys, making sure they are authentic. Now we are going to
take a closer look at what DNSSEC validation actually does, and some other options.
This “auto” line enables automatic DNSSEC trust anchor configuration
using the managed-keys feature. In this case, no manual key
configuration is needed. There are three possible choices for the
dnssec-validation option:
yes: DNSSEC validation is enabled, but a trust anchor must be
manually configured. No validation actually takes place until
at least one trusted key has been manually configured.
no: DNSSEC validation is disabled, and the recursive server behaves
in the “old-fashioned” way of performing insecure DNS lookups.
auto: DNSSEC validation is enabled, and a default trust anchor
(included as part of BIND 9) for the DNS root zone is used. This is the
default; BIND automatically does this if there is no
dnssec-validation line in the configuration file.
Let’s discuss the difference between yes and auto. If set to
yes, the trust anchor must be manually defined and maintained
using the trust-anchors statement (with either the static-key or
static-ds modifier) in the configuration file; if set to
auto (the default, and as shown in the example), then no further
action should be required as BIND includes a copy [4] of the root key.
When set to auto, BIND automatically keeps the keys (also known as
trust anchors, discussed in Trust Anchors)
up-to-date without intervention from the DNS administrator.
We recommend using the default auto unless there is a good reason to
require a manual trust anchor. To learn more about trust anchors,
please refer to Trusted Keys and Managed Keys.
Now you’ve enabled validation on your recursive name server and
verified that it works. What exactly changed? In
How Does DNSSEC Change DNS Lookup? we looked at a very
high-level, simplified version of the 12 steps of the DNSSEC validation process. Let’s revisit
that process now and see what your validating resolver is doing in more
detail. Again, as an example we are looking up the A record for the
domain name www.isc.org (see The 12-Step DNSSEC Validation Process (Simplified)):
The validating resolver queries the isc.org name servers for the
A record of www.isc.org. This query has the DNSSECOK (do) bit set to 1, notifying the remote authoritative
server that DNSSEC answers are desired.
Since the zone isc.org is signed, and its name servers are
DNSSEC-aware, it responds with the answer to the A record query plus
the RRSIG for the A record.
The validating resolver queries for the DNSKEY for isc.org.
The isc.org name server responds with the DNSKEY and RRSIG
records. The DNSKEY is used to verify the answers received in #2.
The validating resolver queries the parent (.org) for the DS
record for isc.org.
The .org name server is also DNSSEC-aware, so it responds with the
DS and RRSIG records. The DS record is used to verify the answers
received in #4.
The validating resolver queries for the DNSKEY for .org.
The .org name server responds with its DNSKEY and RRSIG. The DNSKEY
is used to verify the answers received in #6.
The validating resolver queries the parent (root) for the DS record
for .org.
The root name server, being DNSSEC-aware, responds with DS and RRSIG
records. The DS record is used to verify the answers received in #8.
The validating resolver queries for the DNSKEY for root.
The root name server responds with its DNSKEY and RRSIG. The DNSKEY is
used to verify the answers received in #10.
After step #12, the validating resolver takes the DNSKEY received and
compares it to the key or keys it has configured, to decide whether
the received key can be trusted. We talk about these locally
configured keys, or trust anchors, in Trust Anchors.
With DNSSEC, every response includes not just the
answer, but a digital signature (RRSIG) as well, so the
validating resolver can verify the answer received. That is what we
look at in the next section, How Are Answers Verified?.
Keep in mind, as you read this section, that although words like
“encryption” and “decryption”
are used here from time to time, DNSSEC does not provide privacy.
Public key cryptography is used to verify data authenticity (who
sent it) and data integrity (it did not change during transit), but
any eavesdropper can still see DNS requests and responses in
clear text, even when DNSSEC is enabled.
So how exactly are DNSSEC answers verified? Let’s first see how verifiable information is
generated. On the authoritative server, each DNS record (or message) is
run through a hash function, and this hashed value is then encrypted by a
private key. This encrypted hash value is the digital signature.
When the validating resolver queries for the resource record, it
receives both the plain-text message and the digital signature(s). The
validating resolver knows the hash function used (it is listed in the digital
signature record itself), so it can take the plain-text message and run
it through the same hash function to produce a hashed value, which we’ll call
hash value X. The validating resolver can also obtain the public key
(published as DNSKEY records), decrypt the digital signature, and get
back the original hashed value produced by the authoritative server,
which we’ll call hash value Y. If hash values X and Y are identical, and
the time is correct (more on what this means below), the answer is
verified, meaning this answer came from the authoritative server
(authenticity), and the content remained intact during transit
(integrity).
When a validating resolver queries for the A record ftp.isc.org, it
receives both the A record and the RRSIG record. It runs the A record
through a hash function (in this example, SHA256 as
indicated by the number 13, signifying ECDSAP256SHA256) and produces
hash value X. The resolver also fetches the appropriate DNSKEY record to
decrypt the signature, and the result of the decryption is hash value Y.
But wait, there’s more! Just because X equals Y doesn’t mean everything
is good. We still have to look at the time. Remember we mentioned a
little earlier that we need to check if the time is correct? Look
at the two timestamps in our example above:
Signature Expiration: 20200401191851
Signature Inception: 20200302184340
This tells us that this signature was generated UTC March 2nd, 2020, at
6:43:40 PM (20200302184340), and it is good until UTC April 1st, 2020,
7:18:51 PM (20200401191851). The validating resolver’s current
system time needs to fall between these two timestamps. If it does not, the
validation fails, because it could be an attacker replaying an old
captured answer set from the past, or feeding us a crafted one with
incorrect future timestamps.
If the answer passes both the hash value check and the timestamp check, it is
validated and the authenticated data (ad) bit is set, and the response
is sent to the client; if it does not verify, a SERVFAIL is returned to
the client.
A trust anchor is a key that is placed into a validating resolver, so
that the validator can verify the results of a given request with a
known or trusted public key (the trust anchor). A validating resolver
must have at least one trust anchor installed to perform DNSSEC
validation.
In the section How Does DNSSEC Change DNS Lookup (Revisited)?,
we walked through the 12 steps of the DNSSEC lookup process. At the end
of the 12 steps, a critical comparison happens: the key received from
the remote server and the key we have on file are compared to see if we
trust it. The key we have on file is called a trust anchor, sometimes
also known as a trust key, trust point, or secure entry point.
The 12-step lookup process describes the DNSSEC lookup in the ideal
world, where every single domain name is signed and properly delegated,
and where each validating resolver only needs to have one trust anchor - that
is, the root’s public key. But there is no restriction that the
validating resolver must only have one trust anchor. In fact, in the
early stages of DNSSEC adoption, it was not unusual for a validating
resolver to have more than one trust anchor.
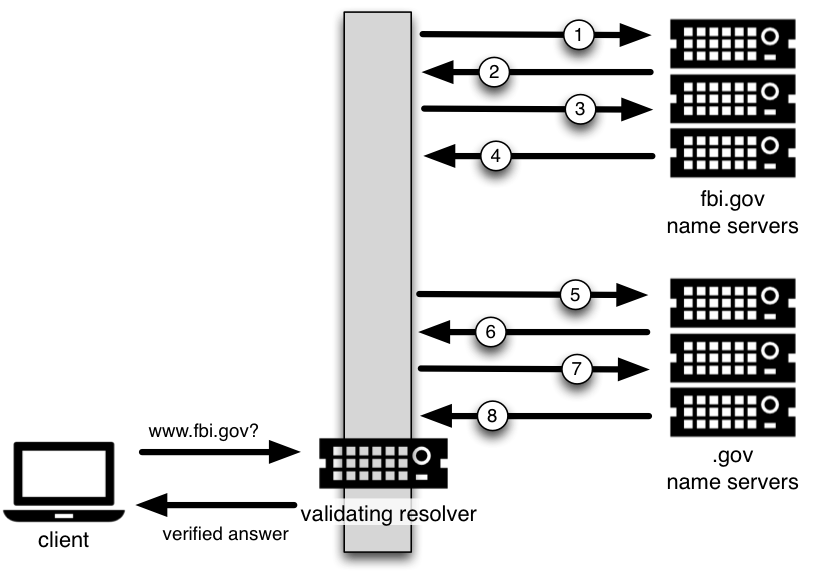
For instance, before the root zone was signed (in July 2010), some
validating resolvers that wished to validate domain names in the .gov
zone needed to obtain and install the key for .gov. A sample lookup
process for www.fbi.gov at that time would have been eight steps rather
than 12:
The validating resolver queried fbi.gov name server for the A
record of www.fbi.gov.
The FBI’s name server responded with the answer and its RRSIG.
The validating resolver queried the FBI’s name server for its DNSKEY.
The FBI’s name server responded with the DNSKEY and its RRSIG.
The validating resolver queried a .gov name server for the DS
record of fbi.gov.
The .gov name server responded with the DS record and the
associated RRSIG for fbi.gov.
The validating resolver queried the .gov name server for its DNSKEY.
The .gov name server responded with its DNSKEY and the associated
RRSIG.
This all looks very similar, except it’s shorter than the 12 steps that
we saw earlier. Once the validating resolver receives the DNSKEY file in
#8, it recognizes that this is the manually configured trusted key
(trust anchor), and never goes to the root name servers to ask for the
DS record for .gov, or ask the root name servers for their DNSKEY.
In fact, whenever the validating resolver receives a DNSKEY, it checks
to see if this is a configured trusted key to decide whether it
needs to continue chasing down the validation chain.
Since the resolver is validating, we must have at least one key (trust
anchor) configured. How did it get here, and how do we maintain it?
If you followed the recommendation in
Easy-Start Guide for Recursive Servers, by setting
dnssec-validation to auto, there is nothing left to do.
BIND already includes a copy of the root key (in the file
bind.keys), [3] and automatically updates it when the root key
changes. [4] It looks something like this:
trust-anchors{# This key (20326) was published in the root zone in 2017..initial-key25738"AwEAAaz/tAm8yTn4Mfeh5eyI96WSVexTBAvkMgJzkKTOiW1vkIbzxeF3+/4RgWOq7HrxRixHlFlExOLAJr5emLvN7SWXgnLh4+B5xQlNVz8Og8kvArMtNROxVQuCaSnIDdD5LKyWbRd2n9WGe2R8PzgCmr3EgVLrjyBxWezF0jLHwVN8efS3rCj/EWgvIWgb9tarpVUDK/b58Da+sqqls3eNbuv7pr+eoZG+SrDK6nWeL3c6H5Apxz7LjVc1uTIdsIXxuOLYA4/ilBmSVIzuDWfdRUfhHdY6+cn8HFRm+2hM8AnXGXws9555KrUB5qihylGa8subX2Nn6UwNR1AkUTV74bU=";};
You can, of course, decide to manage this key manually yourself.
First, you need to make sure that dnssec-validation is set
to yes rather than auto:
options{dnssec-validationyes;};
Then, download the root key manually from a trustworthy source, such as
https://www.isc.org/bind-keys. Finally, take the root key you
manually downloaded and put it into a trust-anchors statement as
shown below:
trust-anchors{# This key (20326) was published in the root zone in 2017..static-key25738"AwEAAaz/tAm8yTn4Mfeh5eyI96WSVexTBAvkMgJzkKTOiW1vkIbzxeF3+/4RgWOq7HrxRixHlFlExOLAJr5emLvN7SWXgnLh4+B5xQlNVz8Og8kvArMtNROxVQuCaSnIDdD5LKyWbRd2n9WGe2R8PzgCmr3EgVLrjyBxWezF0jLHwVN8efS3rCj/EWgvIWgb9tarpVUDK/b58Da+sqqls3eNbuv7pr+eoZG+SrDK6nWeL3c6H5Apxz7LjVc1uTIdsIXxuOLYA4/ilBmSVIzuDWfdRUfhHdY6+cn8HFRm+2hM8AnXGXws9555KrUB5qihylGa8subX2Nn6UwNR1AkUTV74bU=";};
While this trust-anchors statement and the one in the bind.keys
file appear similar, the definition of the key in bind.keys has the
initial-key modifier, whereas in the statement in the configuration
file, that is replaced by static-key. There is an important
difference between the two: a key defined with static-key is always
trusted until it is deleted from the configuration file. With the
initial-key modified, keys are only trusted once: for as long as it
takes to load the managed key database and start the key maintenance
process. Thereafter, BIND uses the managed keys database
(managed-keys.bind.jnl) as the source of key information.
Warning
Remember, if you choose to manage the keys on your own, whenever the
key changes (which, for most zones, happens on a periodic basis),
the configuration needs to be updated manually. Failure to do so will
result in breaking nearly all DNS queries for the subdomain of the
key. So if you are manually managing .gov, all domain names in
the .gov space may become unresolvable; if you are manually
managing the root key, you could break all DNS requests made to your
recursive name server.
Explicit management of keys was common in the early days of DNSSEC, when
neither the root zone nor many top-level domains were signed. Since
then, over 90% of
the top-level domains have been signed, including all the largest ones.
Unless you have a particular need to manage keys yourself, it is best to
use the BIND defaults and let the software manage the root key.
Traditional DNS responses are typically small in size (less than 512
bytes) and fit nicely into a small UDP packet. The Extension mechanism
for DNS (EDNS, or EDNS(0)) offers a mechanism to send DNS data in
larger packets over UDP. To support EDNS, both the DNS server
and the network need to be properly prepared to support the larger
packet sizes and multiple fragments.
This is important for DNSSEC, since the dig+do bit that signals
DNSSEC-awareness is carried within EDNS, and DNSSEC responses are larger
than traditional DNS ones. If DNS servers and the network environment cannot
support large UDP packets, it will cause retransmission over TCP, or the
larger UDP responses will be discarded. Users will likely experience
slow DNS resolution or be unable to resolve certain names at all.
Note that EDNS applies regardless of whether you are validating DNSSEC, because
BIND has DNSSEC enabled by default.
Please see Network Requirements for more information on what
DNSSEC expects from the network environment.
For many years, BIND has had EDNS enabled by default,
and the UDP packet size is set to a maximum of 4096 bytes. The DNS
administrator should not need to perform any reconfiguration. You can
use dig to verify that your server supports EDNS and see the UDP packet
size it allows with this dig command:
$ dig @10.53.0.1 www.isc.org. A +dnssec +multiline
; <<>> DiG 9.16.0 <<>> @10.53.0.1 ftp.isc.org a +dnssec +multiline
; (1 server found)
;; global options: +cmd
;; Got answer:
;; ->>HEADER<<- opcode: QUERY, status: NOERROR, id: 48742
;; flags: qr rd ra ad; QUERY: 1, ANSWER: 2, AUTHORITY: 0, ADDITIONAL: 1
;; OPT PSEUDOSECTION:
; EDNS: version: 0, flags: do; udp: 4096
; COOKIE: 29a9705c2160b08c010000005e67a4a102b9ae079c1b24c8 (good)
;; QUESTION SECTION:
;ftp.isc.org. IN A
;; ANSWER SECTION:
ftp.isc.org. 300 IN A 149.20.1.49
ftp.isc.org.      300 IN RRSIG A 13 3 300 (
                20200401191851 20200302184340 27566 isc.org.
                e9Vkb6/6aHMQk/t23Im71ioiDUhB06sncsduoW9+Asl4
                L3TZtpLvZ5+zudTJC2coI4D/D9AXte1cD6FV6iS6PQ== )
;; Query time: 452 msec
;; SERVER: 10.53.0.1#53(10.53.0.1)
;; WHEN: Tue Mar 10 14:30:57 GMT 2020
;; MSG SIZE rcvd: 187
Once you’ve verified that your name servers have EDNS enabled, that should be the
end of the story, right? Unfortunately, EDNS is a hop-by-hop extension
to DNS. This means the use of EDNS is negotiated between each pair of
hosts in a DNS resolution process, which in turn means if one of your
upstream name servers (for instance, your ISP’s recursive name server
that your name server forwards to) does not support EDNS, you may experience DNS
lookup failures or be unable to perform DNSSEC validation.
If both your recursive name server and your ISP’s name servers
support EDNS, we are all good here, right? Not so fast. Since these large
packets have to traverse the network, the network infrastructure
itself must allow them to pass.
When data is physically transmitted over a network, it has to be broken
down into chunks. The size of the data chunk is known as the Maximum
Transmission Unit (MTU), and it can differ from network to
network. IP fragmentation occurs when a large data packet needs to be
broken down into chunks smaller than the
MTU; these smaller chunks then need to be reassembled back into the large
data packet at their destination. IP fragmentation is not necessarily a bad thing, and it most
likely occurs on your network today.
Some network equipment, such as a firewall, may make assumptions about
DNS traffic. One of these assumptions may be how large each DNS packet
is. When a firewall sees a larger DNS packet than it expects, it may either
reject the large packet or drop its fragments because the firewall
thinks it’s an attack. This configuration probably didn’t cause problems
in the past, since traditional DNS packets are usually pretty small in
size. However, with DNSSEC, these configurations need to be updated,
since DNSSEC traffic regularly exceeds 1500 bytes (a common MTU value).
If the configuration is not updated to support a larger DNS packet size,
it often results in the larger packets being rejected, and to the
end user it looks like the queries go unanswered. Or in the case of
fragmentation, only a part of the answer makes it to the validating
resolver, and your validating resolver may need to re-ask the question
again and again, creating the appearance for end users that the DNS/network is slow.
While you are updating the configuration on your network equipment, make
sure TCP port 53 is also allowed for DNS traffic.
Yes. DNS uses TCP port 53 as a fallback mechanism, when it cannot use
UDP to transmit data. This has always been the case, even long before
the arrival of DNSSEC. Traditional DNS relies on TCP port 53 for
operations such as zone transfer. The use of DNSSEC, or DNS with IPv6
records such as AAAA, increases the chance that DNS data will be
transmitted via TCP.
Due to the increased packet size, DNSSEC may fall back to TCP more often
than traditional (insecure) DNS. If your network blocks or
filters TCP port 53 today, you may already experience instability with
DNS resolution, before even deploying DNSSEC.
This section provides the basic information needed to set up a
DNSSEC-enabled authoritative name server. A DNSSEC-enabled (or
“signed”) zone contains additional resource records that are used to
verify the authenticity of its zone information.
To convert a traditional (insecure) DNS zone to a secure one, we need to
create some additional records (DNSKEY, RRSIG, and NSEC or NSEC3), and
upload verifiable information (such as a DS record) to the parent zone to
complete the chain of trust. For more information about DNSSEC resource
records, please see What Does DNSSEC Add to DNS?.
Note
In this chapter, we assume all configuration files, key files, and
zone files are stored in /etc/bind, and most examples show
commands run as the root user. This may not be ideal, but the point is
not to distract from what is important here: learning how to sign
a zone. There are many best practices for deploying a more secure
BIND installation, with techniques such as jailed process and
restricted user privileges, but those are not covered
in this document. We trust you, a responsible DNS
administrator, to take the necessary precautions to secure your
system.
For the examples below, we work with the assumption that
there is an existing insecure zone example.com that we are
converting to a secure zone.
Enabling Automated DNSSEC Zone Maintenance and Key Generation
To sign a zone, add the following statement to its
zone clause in the BIND 9 configuration file:
The dnssec-policy statement causes the zone to be signed and turns
on automatic maintenance for the zone. This includes re-signing the zone
as signatures expire and replacing keys on a periodic basis. The value
default selects the default policy, which contains values suitable
for most situations. We cover the creation of a custom policy in
Creating a Custom DNSSEC Policy, but for the moment we are accepting the
default values.
Previously, if a zone with a dnssec-policy did not have dynamic
DNS set up and inline-signing was not explicity set, BIND 9 used
inline-signing implicitly. But this caused a lot of problems when operators
switched on or off dynamic DNS for their zones. Therefor, you now have to
configure it explicitly.
When the configuration file is updated, tell named to
reload the configuration file by running rndcreconfig:
# rndc reconfig
And that’s it - BIND signs your zone.
At this point, before you go away and merrily add dnssec-policy
statements to all your zones, we should mention that, like a number of
other BIND configuration options, its scope depends on where it is placed. In
the example above, we placed it in a zone clause, so it applied only
to the zone in question. If we had placed it in a view clause, it
would have applied to all zones in the view; and if we had placed it in
the options clause, it would have applied to all zones served by
this instance of BIND.
The BIND 9 reconfiguration starts the process of signing the zone.
First, it generates a key for the zone and includes it
in the published zone. The log file shows messages such as these:
It then starts signing the zone. How long this process takes depends on the
size of the zone, the speed of the server, and how much activity is
taking place. We can check what is happening by using rndc,
entering the command:
# rndc signing -list example.com
While the signing is in progress, the output is something like:
Signingwithkey10376/ECDSAP256SHA256
and when it is finished:
Donesigningwithkey10376/ECDSAP256SHA256
When the second message appears, the zone is signed.
Before moving on to the next step of coordinating with the parent zone,
let’s make sure everything looks good using delv. We want to
simulate what a validating resolver will check, by telling
delv to use a specific trust anchor.
First, we need to make a copy of the key created by BIND. This
is in the directory you set with the directory statement in
your configuration file’s options clause, and is named something
like Kexample.com.+013.10376.key:
Now we can run the delv command and instruct it to use this
trusted-key file to validate the answer it receives from the
authoritative name server 192.168.1.13:
$ delv @192.168.1.13 -a /tmp/example.key +root=example.com example.com. SOA +multiline
; fully validated
example.com.        600 IN SOA ns1.example.com. admin.example.com. (
                2020040703 ; serial
                1800       ; refresh (30 minutes)
                900        ; retry (15 minutes)
                2419200    ; expire (4 weeks)
                300        ; minimum (5 minutes)
                )
example.com.        600 IN RRSIG SOA 13 2 600 (
                20200421150255 20200407140255 10376 example.com.
                jBsz92zwAcGMNV/yu167aKQZvFyC7BiQe1WEnlogdLTF
                oq4yBQumOhO5WX61LjA17l1DuLWcd/ASwlUZWFGCYQ== )
Once everything is complete on our name server, we need to generate some
information to be uploaded to the parent zone to complete the chain of
trust. The format and the upload methods are actually dictated by your
parent zone’s administrator, so contact your registrar or parent zone
administrator to find out what the actual format should be and how to
deliver or upload the information to the parent zone.
What about your zone between the time you signed it and the time your
parent zone accepts the upload? To the rest of the world, your
zone still appears to be insecure, because if a validating
resolver attempts to validate your domain name via
your parent zone, your parent zone will indicate that you are
not yet signed (as far as it knows). The validating resolver will then
give up attempting to validate your domain name, and will fall back to the
insecure DNS. Until you complete this final step with your
parent zone, your zone remains insecure.
Note
Before uploading to your parent zone, verify that your newly signed
zone has propagated to all of your name servers (usually via zone
transfers). If some of your name servers still have unsigned zone
data while the parent tells the world it should be signed, validating
resolvers around the world cannot resolve your domain name.
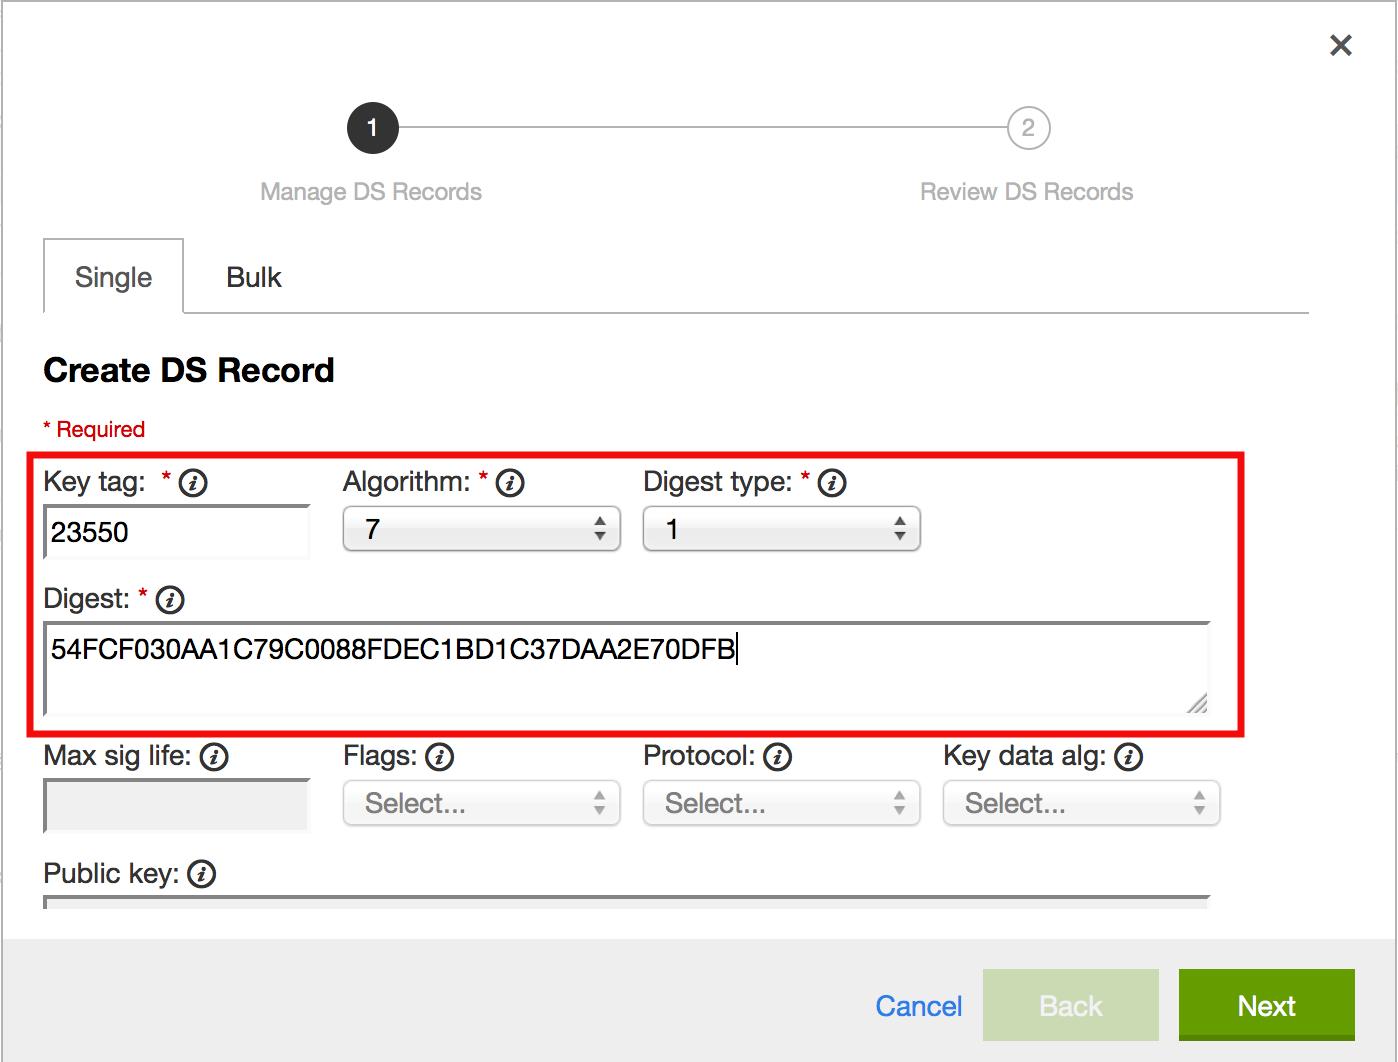
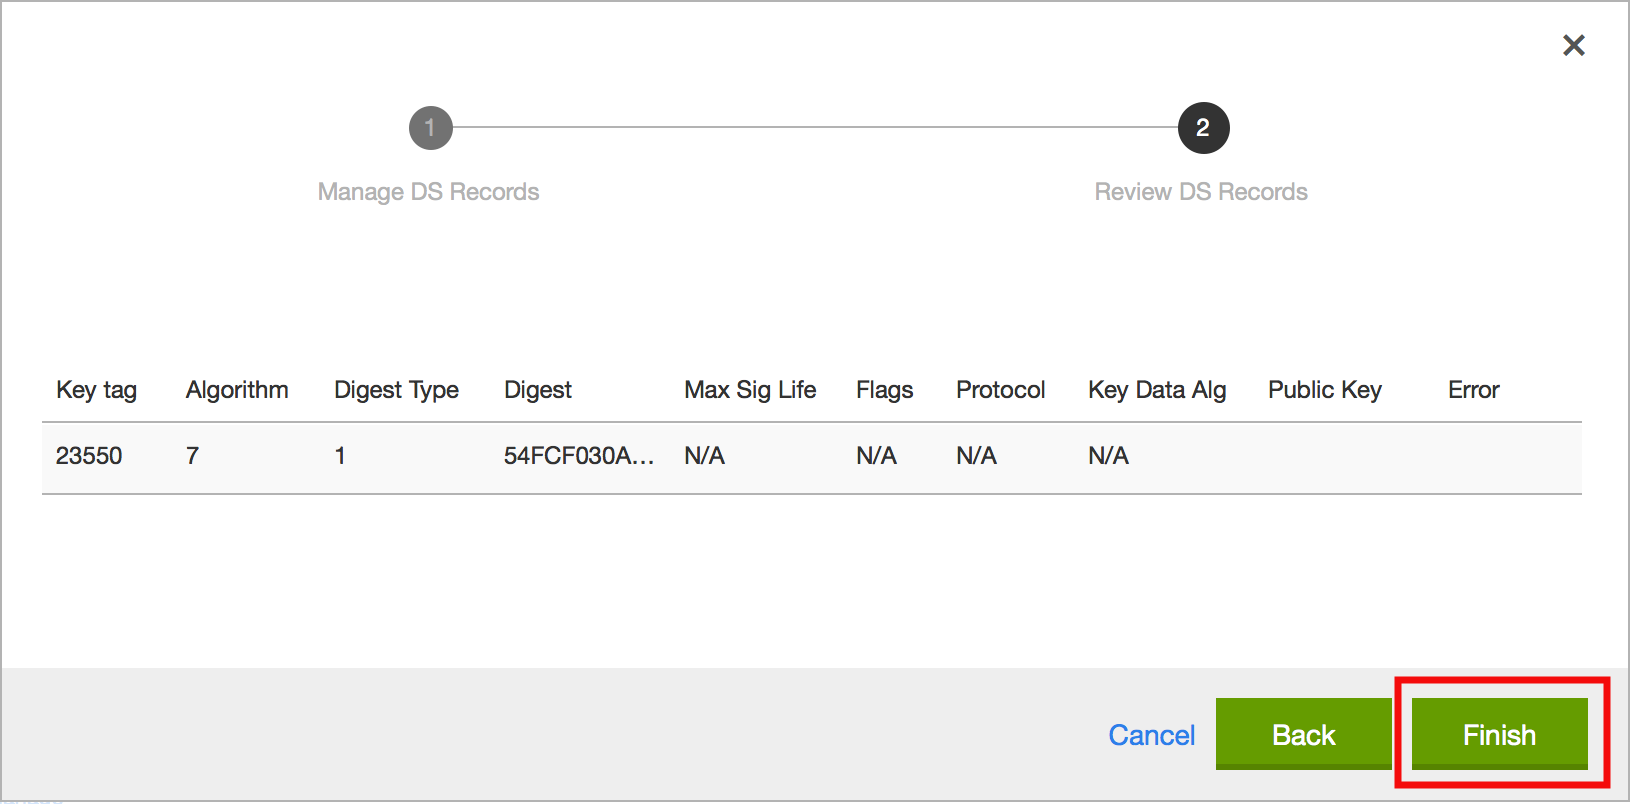
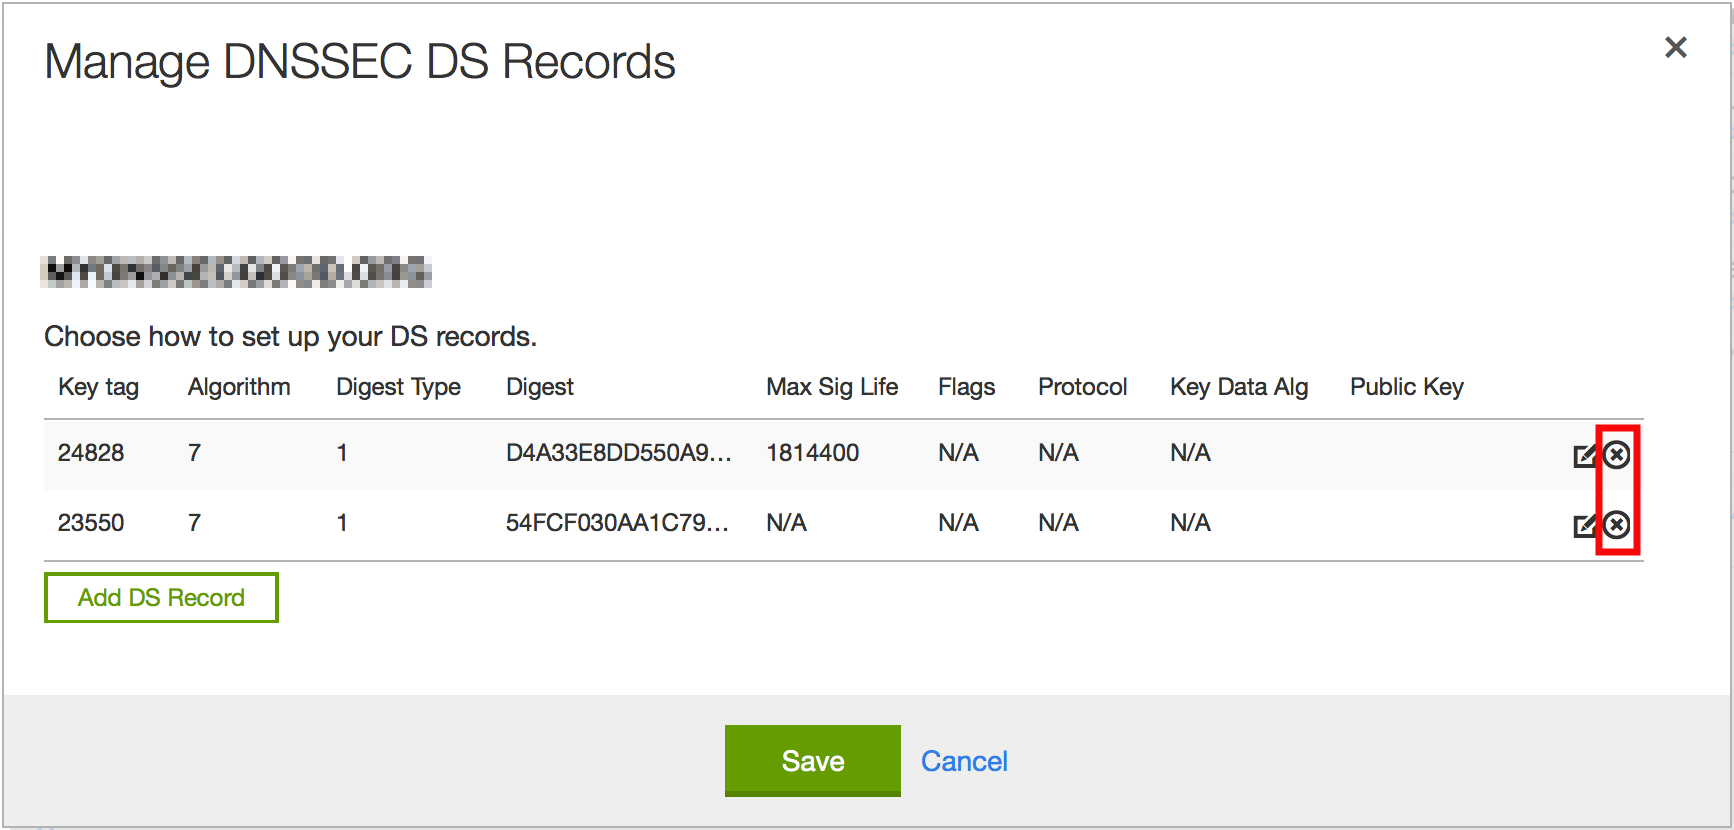
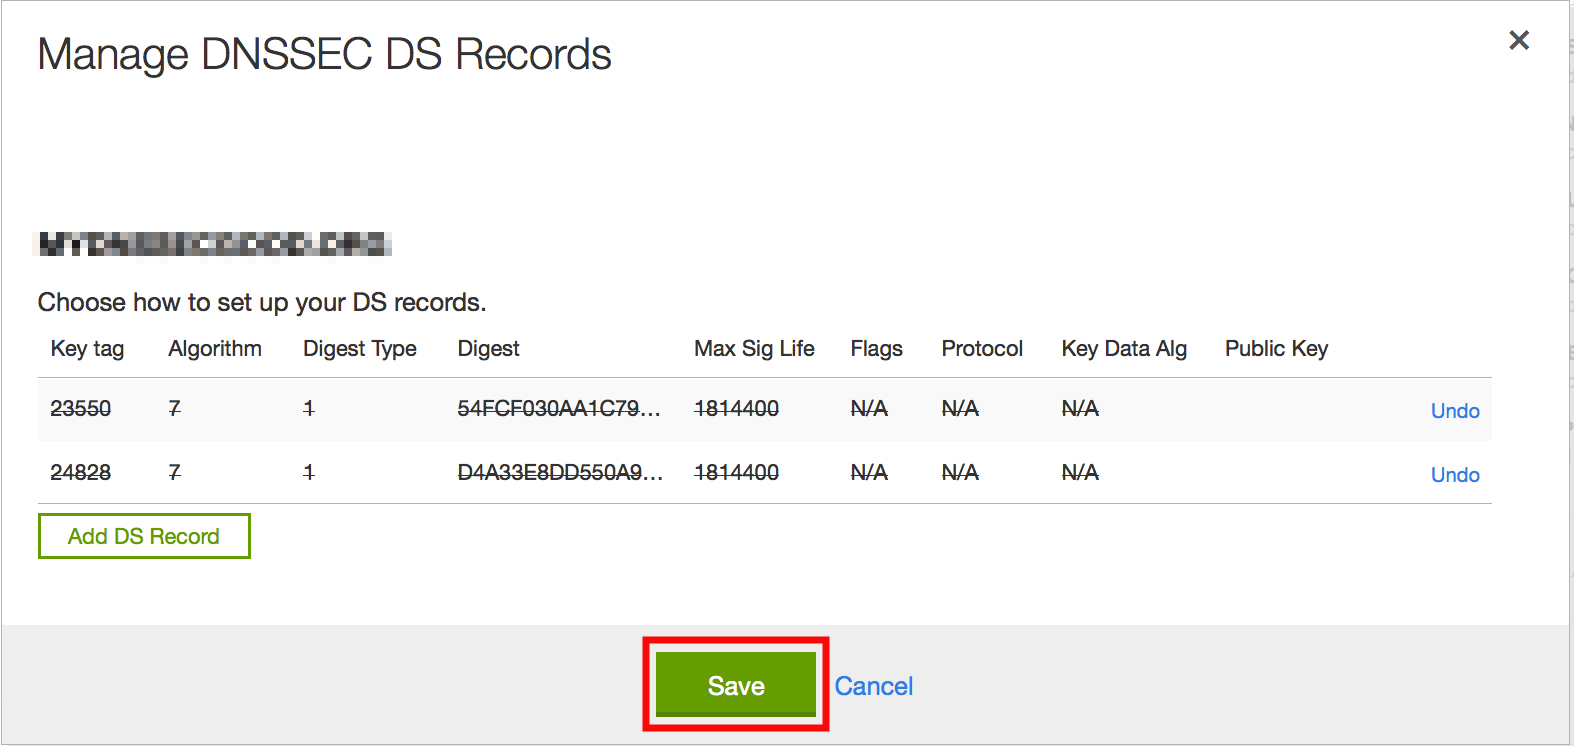
Here are some examples of what you may upload to your parent zone, with
the DNSKEY/DS data shortened for display. Note that no matter what
format may be required, the end result is the parent zone
publishing DS record(s) based on the information you upload. Again,
contact your parent zone administrator(s) to find out the
correct format for their system.
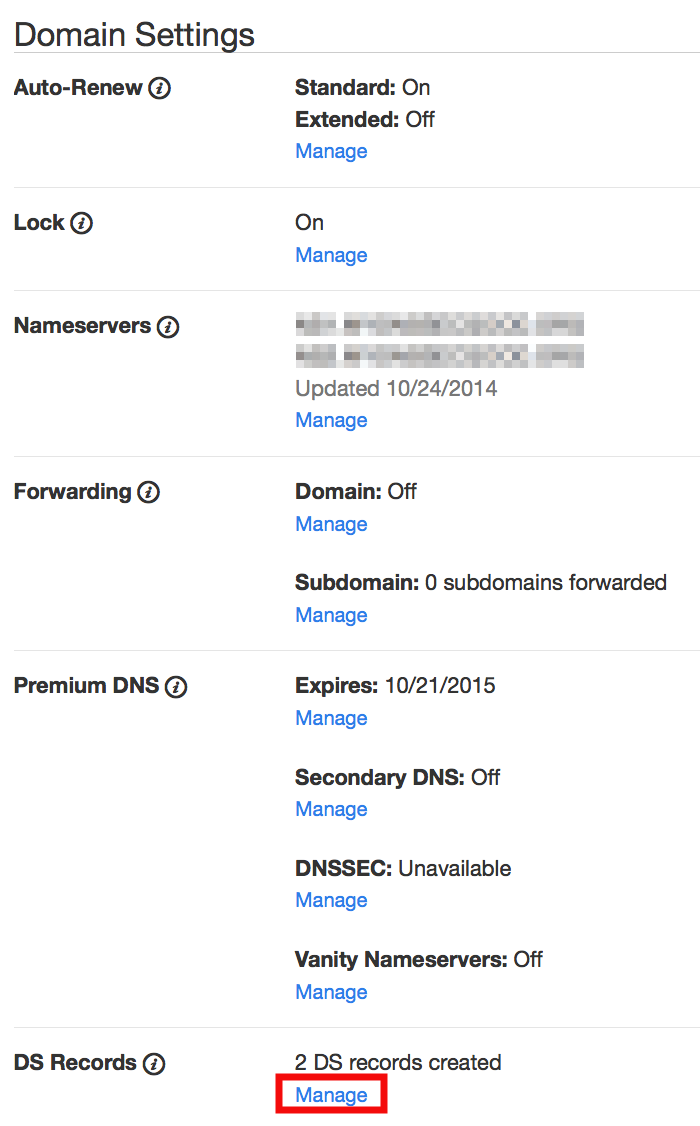
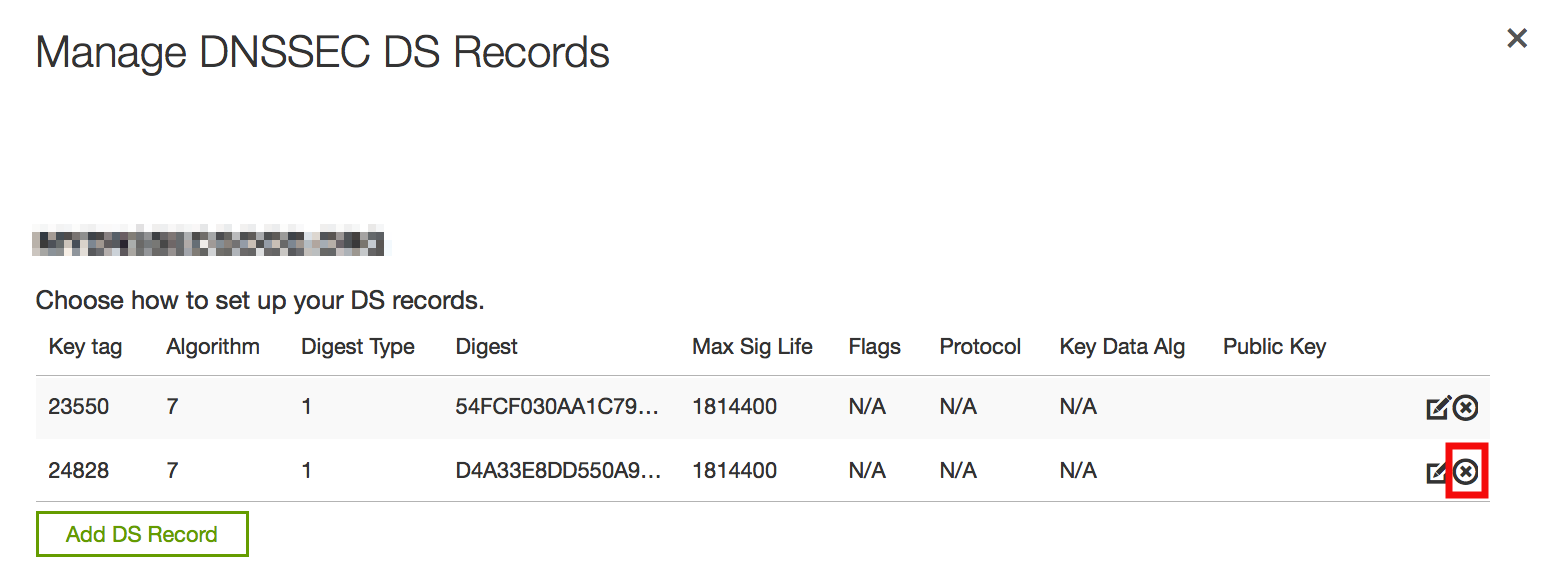
Congratulations! Your zone is signed, your secondary servers have
received the new zone data, and the parent zone has accepted your upload
and published your DS record. Your zone is now officially
DNSSEC-enabled. What happens next? That is basically it - BIND
takes care of everything else. As for updating your zone file, you can
continue to update it the same way as prior to signing your
zone; the normal work flow of editing a zone file and using the rndc
command to reload the zone still works as usual, and although you are
editing the unsigned version of the zone, BIND generates the signed
version automatically.
Curious as to what all these commands did to your zone file? Read on to
Your Zone, Before and After DNSSEC and find out. If you are
interested in how to roll this out to your existing primary and
secondary name servers, check out DNSSEC Signing in
the Recipes chapter.
When we assigned the default DNSSEC policy to the zone, we provided the
minimal amount of information to convert a traditional DNS
zone into a DNSSEC-enabled zone. This is what the zone looked like
before we started:
$ dig @192.168.1.13 example.com. AXFR +multiline +onesoa

; <<>> DiG 9.16.0 <<>> @192.168.1.13 example.com AXFR +multiline +onesoa
; (1 server found)
;; global options: +cmd
example.com.        600 IN SOA ns1.example.com. admin.example.com. (
                2020040700 ; serial
                1800       ; refresh (30 minutes)
                900        ; retry (15 minutes)
                2419200    ; expire (4 weeks)
                300        ; minimum (5 minutes)
                )
example.com.        600 IN NS ns1.example.com.
ftp.example.com.    600 IN A 192.168.1.200
ns1.example.com.    600 IN A 192.168.1.1
web.example.com.    600 IN CNAME www.example.com.
www.example.com.    600 IN A 192.168.1.100
Below shows the test zone example.com after reloading the
server configuration. Clearly, the zone grew in size, and the
number of records multiplied:
But this is a really messy way to tell if the zone is set up properly
with DNSSEC. Fortunately, there are tools to help us with that. Read on
to How To Test Authoritative Zones to learn more.
One way to see if your zone is signed is to check for the
presence of DNSKEY record types. In our example, we created a single
key, and we expect to see it returned when we query for it.
$ dig @192.168.1.13 example.com. DNSKEY +multiline

; <<>> DiG 9.16.0 <<>> @10.53.0.6 example.com DNSKEY +multiline
; (1 server found)
;; global options: +cmd
;; Got answer:
;; ->>HEADER<<- opcode: QUERY, status: NOERROR, id: 18637
;; flags: qr aa rd; QUERY: 1, ANSWER: 1, AUTHORITY: 0, ADDITIONAL: 1
;; WARNING: recursion requested but not available

;; OPT PSEUDOSECTION:
; EDNS: version: 0, flags:; udp: 4096
; COOKIE: efe186423313fb66010000005e8c997e99864f7d69ed7c11 (good)
;; QUESTION SECTION:
;example.com.       IN DNSKEY

;; ANSWER SECTION:
example.com.        3600 IN DNSKEY 257 3 13 (
                6saiq99qDBb5b4G4cx13cPjFTrIvUs3NW44SvbbHorHb
                kXwOzeGAWyPORN+pwEV/LP9+FHAF/JzAJYdqp+o0dw==
                ) ; KSK; alg = ECDSAP256SHA256 ; key id = 10376
Another way to see if your zone data is signed is to check for the
presence of a signature. With DNSSEC, every record
[5] now comes with at least one corresponding
signature, known as an RRSIG.
$ dig @192.168.1.13 example.com. SOA +dnssec +multiline

; <<>> DiG 9.16.0 <<>> @10.53.0.6 example.com SOA +dnssec +multiline
; (1 server found)
;; global options: +cmd
;; Got answer:
;; ->>HEADER<<- opcode: QUERY, status: NOERROR, id: 45219
;; flags: qr aa rd; QUERY: 1, ANSWER: 2, AUTHORITY: 0, ADDITIONAL: 1
;; WARNING: recursion requested but not available

;; OPT PSEUDOSECTION:
; EDNS: version: 0, flags: do; udp: 4096
; COOKIE: 75adff4f4ce916b2010000005e8c99c0de47eabb7951b2f5 (good)
;; QUESTION SECTION:
;example.com.       IN SOA

;; ANSWER SECTION:
example.com.        600 IN SOA ns1.example.com. admin.example.com. (
                2020040703 ; serial
                1800       ; refresh (30 minutes)
                900        ; retry (15 minutes)
                2419200    ; expire (4 weeks)
                300        ; minimum (5 minutes)
                )
example.com.        600 IN RRSIG SOA 13 2 600 (
                20200421150255 20200407140255 10376 example.com.
                jBsz92zwAcGMNV/yu167aKQZvFyC7BiQe1WEnlogdLTF
                oq4yBQumOhO5WX61LjA17l1DuLWcd/ASwlUZWFGCYQ== )
The serial number was automatically incremented from the old, unsigned
version. named keeps track of the serial number of the signed version of
the zone independently of the unsigned version. If the unsigned zone is
updated with a new serial number that is higher than the one in the
signed copy, then the signed copy is increased to match it;
otherwise, the two are kept separate.
Our original zone file example.com.db remains untouched, and named has
generated three additional files automatically for us (shown below). The
signed DNS data is stored in example.com.db.signed and in the
associated journal file.
# cd /etc/bind# lsexample.com.dbexample.com.db.jbkexample.com.db.signedexample.com.db.signed.jnl
.signed: the signed version of the zone in raw format
.signed.jnl: a journal file for the signed version of the zone
These files are stored in raw (binary) format for faster loading. To
reveal the human-readable version, use named-compilezone
as shown below. In the example below, we run the command on the
raw format zone example.com.db.signed to produce a text version of
the zone example.com.text:
# named-compilezone -f raw -F text -o example.com.text example.com example.com.db.signedzoneexample.com/IN:loadedserial2014112008(DNSSECsigned)dumpzonetoexample.com.text...doneOK
Although this is not strictly related to whether the zone is
signed, a critical part of DNSSEC is the trust relationship between the
parent and the child. Just because we, the child, have all the correctly
signed records in our zone does not mean it can be fully validated by a
validating resolver, unless our parent’s data agrees with ours. To check
if our upload to the parent was successful, ask the parent name server
for the DS record of our child zone; we should get back the DS record(s)
containing the information we uploaded in
Uploading Information to the Parent Zone:
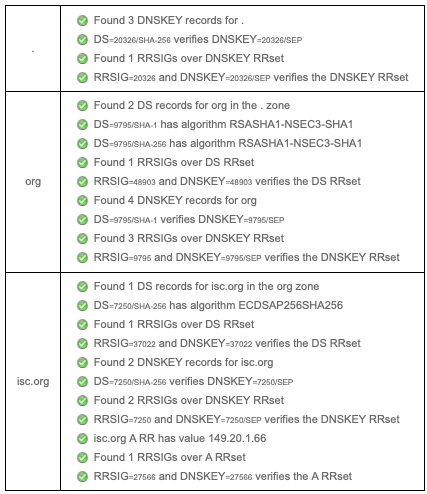
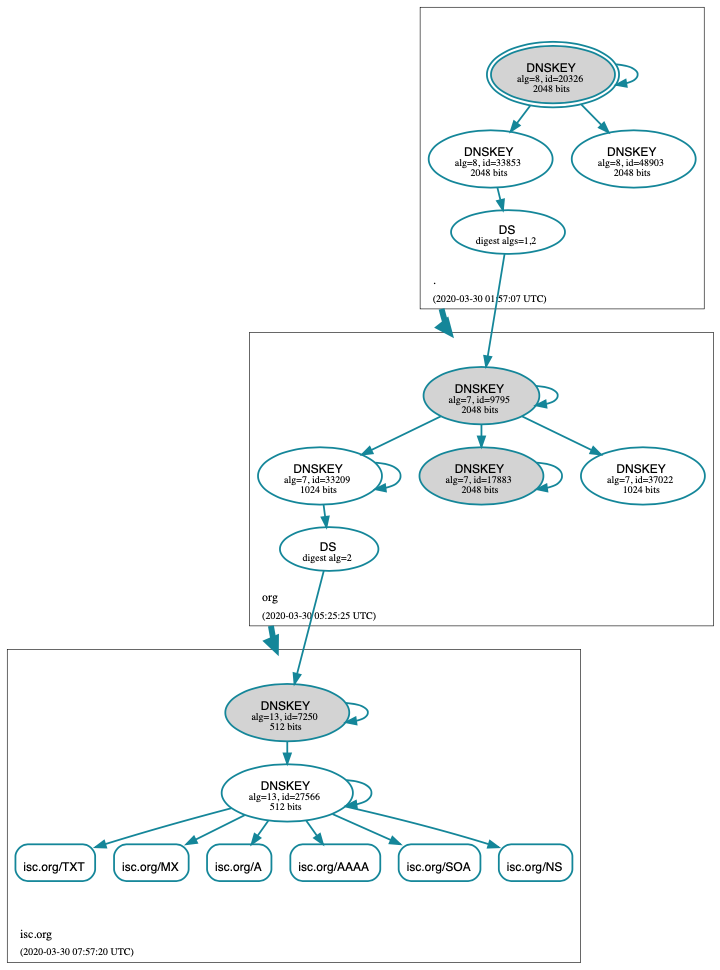
We recommend two tools, below: Verisign DNSSEC Debugger and DNSViz. Others can
be found via a simple online search. These excellent online tools are an easy
way to verify that your domain name is fully secured.
This tool shows a nice summary of checks performed on your domain name.
You can expand it to view more details for each of the items checked, to
get a detailed report.
Signing a zone requires a number of separate steps:
Generation of the keys to sign the zone.
Inclusion of the keys into the zone.
Signing of the records in the file (including the generation of the
NSEC or NSEC3 records).
Maintaining a signed zone comprises a set of ongoing tasks:
Re-signing the zone as signatures approach expiration.
Generation of new keys as the time approaches for a key roll.
Inclusion of new keys into the zone when the rollover starts.
Transition from signing the zone with the old set of keys to signing
the zone with the new set of keys.
Waiting the appropriate interval before removing the old keys from
the zone.
Deleting the old keys.
That is quite complex, and it is all handled in BIND 9 with the single
dnssec-policydefault statement. We will see later on (in the
Creating a Custom DNSSEC Policy section) how these actions can be tuned, by
setting up our own DNSSEC policy with customized parameters. However, in many
cases the defaults are adequate.
At the time of this writing (mid-2020), dnssec-policy is still a
relatively new feature in BIND. Although it is the preferred
way to run DNSSEC in a zone, it is not yet able to automatically implement
all the features that are available
with a more “hands-on” approach to signing and key maintenance. For this
reason, we cover alternative signing techniques in
Alternate Ways of Signing a Zone.
As mentioned in Uploading Information to the Parent Zone,
the format of the information uploaded to your parent zone is dictated
by your parent zone administrator. The two main formats are:
DS record format
DNSKEY format
Check with your parent zone to see which format they require.
But how can you get each of the formats from your existing data?
When named turned on automatic
DNSSEC maintenance, essentially the first thing it did was to create
the DNSSEC keys and put them in the directory you specified in the
configuration file. If you look in that directory, you will see three
files with names like Kexample.com.+013+10376.key,
Kexample.com.+013+10376.private, and
Kexample.com.+013+10376.state. The one we are interested in is the
one with the .key suffix, which contains the zone’s public key. (The
other files contain the zone’s private key and the DNSSEC state
associated with the key.) This public key is used to generate the information we
need to pass to the parent.
Below is an example of a DS record format generated from the KSK we
created earlier (Kexample.com.+013+10376.key):
# cd /etc/binddnssec-dsfromkeyKexample.com.+013+10376.keyexample.com.INDS10376132B92E22CAE0B41430EC38D3F7EDF1183C3A94F4D4748569250C15EE33B8312EF0
Some registrars ask their customers to manually specify the types of algorithm
and digest used. In this example, 13 represents the algorithm used, and
2 represents the digest type (SHA-256). The key tag or key ID is 10376.
The key itself is easy to find (it’s difficult to miss that long
base64 string) in the file.
# cd /etc/bind# cat Kexample.com.+013+10376.key;Thisisakey-signingkey,keyid10376,forexample.com.;Created:20200407150255(TueApr716:02:552020);Publish:20200407150255(TueApr716:02:552020);Activate:20200407150255(TueApr716:02:552020)example.com.3600INDNSKEY2573136saiq99qDB...dqp+o0dw==
The remainder of this section describes the contents of a custom DNSSEC
policy. Advanced Discussions describes the concepts
involved here and the pros and cons of choosing particular values. If
you are not already familiar with DNSSEC, it may be worth reading that chapter
first.
Setting up your own DNSSEC policy means that you must include a
dnssec-policy clause in the zone file. This sets values for the
various parameters that affect the signing of zones and the rolling of
keys. The following is an example of such a clause:
The name must be specified. As each zone can use a different policy,
named needs to be able to distinguish between policies. This is
done by giving each policy a name, such as standard in the above
example.
The keys clause lists all keys that should be in the zone, along
with their associated parameters. In this example, we are using the
conventional KSK/ZSK split, with the KSK changed every year and the
ZSK changed every two months (the default DNSSEC policy sets a
CSK that is never changed). Keys are created using the
ECDSAPS256SHA256 algorithm; each KSK/ZSK pair must have the same
algorithm. A CSK combines the functionality of a ZSK and a KSK.
The parameters ending in -ttl are, as expected, the TTLs of the
associated records. Remember that during a key rollover,
we have to wait for records to expire from caches? The values
here tell BIND 9 the maximum amount of time it has to wait for this to
happen. Values can be set for the DNSKEY records in your zone, the
non-DNSKEY records in your zone, and the DS records in the parent
zone.
Another set of time-related parameters are those ending in
-propagation-delay. These tell BIND how long it takes for a
change in zone contents to become available on all secondary servers.
(This may be non-negligible: for example, if a large zone is
transferred over a slow link.)
The policy also sets values for the various signature parameters: how
long the signatures on the DNSKEY and non-DNSKEY records are valid,
and how often BIND should re-sign the zone.
The parameters ending in -safety are there to give
you a bit of leeway in case a key roll doesn’t go to plan. When
introduced into the zone, the publish-safety time is the amount
of additional time, over and above that calculated from the other
parameters, during which the new key is in the zone but before BIND starts
to sign records with it. Similarly, the retire-safety is the
amount of additional time, over and above that calculated from the
other parameters, during which the old key is retained in the zone before
being removed.
Finally, the purge-keys option allows you to clean up key files
automatically after a period of time. If a key has been removed from the
zone, this option will determine how long its key files will be retained
on disk.
(You do not have to specify all the items listed above in your policy
definition. Any that are not set simply take the default value.)
Usually, the exact timing of a key roll, or how long a signature remains
valid, is not critical. For this reason, err on the side of caution when
setting values for the parameters. It is better to have an operation
like a key roll take a few days longer than absolutely required, than it
is to have a quick key roll but have users get validation failures
during the process.
Having defined a new policy called “standard”, we now need to tell
named to use it. We do this by adding a dnssec-policystandard;
statement to the configuration file. Like many other configuration
statements, it can be placed in the options statement (thus applying
to all zones on the server), a view statement (applying to all zones
in the view), or a zone statement (applying only to that zone). In
this example, we’ll add it to the zone statement:
Zone data is signed and the parent zone has published your DS records:
at this point your zone is officially secure. When other
validating resolvers look up information in your zone, they are able to
follow the 12-step process as described in
How Does DNSSEC Change DNS Lookup (Revisited)? and verify the
authenticity and integrity of the answers.
There is not that much left for you, as the DNS administrator, to do on
an ongoing basis. Whenever you update your zone, BIND automatically
re-signs your zone with new RRSIG and NSEC/NSEC3 records, and even
increments the serial number for you. If you choose to split your keys
into a KSK and ZSK, the rolling of the ZSK is completely automatic.
Rolling of a KSK or CSK may require some manual intervention, though,
so let’s examine two more DNSSEC-related resource records, CDS and CDNSKEY.
Passing the DS record to the organization running the parent zone has
always been recognized as a bottleneck in the key rollover process. To
automate the process, the CDS and CDNSKEY resource records were
introduced.
The CDS and CDNSKEY records are identical to the DS and DNSKEY records,
except in the type code and the name. When such a record appears in the
child zone, it is a signal to the parent that it should update the DS it
has for that zone. In essence, when the parent notices
the presence of the CDS and/or CDNSKEY record(s) in the
child zone, it checks these records to verify that they are
signed by a valid key for the zone. If the record(s) successfully
validate, the parent zone’s DS RRset for the child zone is changed to
correspond to the CDS (or CDNSKEY) records. (For more
information on how the signaling works and the issues surrounding it,
please refer to RFC 7344 and RFC 8078.)
Once the zone is signed, the only required manual tasks are
to monitor KSK or CSK key rolls and pass the new DS record to the
parent zone. However, if the parent can process CDS or CDNSKEY records,
you may not even have to do that. [6]
When the time approaches for the roll of a KSK or CSK, BIND adds a
CDS and a CDNSKEY record for the key in question to the apex of the
zone. If your parent zone supports polling for CDS/CDNSKEY records, they
are uploaded and the DS record published in the parent - at least ideally.
If BIND is configured with parental-agents, it will check for the DS
presence. Let’s look at the following configuration excerpt:
BIND will check for the presence of the DS record in the parent zone by querying
its parental agents (defined in RFC 7344 to be the entities that the child
zone has a relationship with to change its delegation information). In the
example above, The zone example.net is configured with two parental agents,
at the addresses 10.53.0.11 and 10.53.0.12. These addresses are used as an
example only. Both addresses will have to respond with a DS RRset that
includes the DS record identifying the key that is being rolled. If one or
both don’t have the DS included yet the rollover is paused, and the check for
DS presence is retried after an hour. The same applies for DS withdrawal.
Alternatively, you can use the rndc tool to tell named that the DS
record has been published or withdrawn. For example:
# rndc dnssec -checkds published example.net
If your parent zone doesn’t support CDS/CDNSKEY, you will have to supply
the DNSKEY or DS record to the parent zone manually when a new KSK appears in
your zone, presumably using the same mechanism you used to upload the
records for the first time. Again, you need to use the rndc tool
to tell named that the DS record has been published.
Although use of the automatic dnssec-policy is the preferred way to sign zones in
BIND, there are occasions where a more manual approach may be
needed, such as when external hardware is used to
generate and sign the zone. dnssec-policy does not currently support
the use of external hardware, so if your security policy requires it, you
need to use one of the methods described here.
The idea of DNSSEC was first discussed in the 1990s and has been
extensively developed over the intervening years. BIND has tracked the
development of this technology, often being the first name server
implementation to introduce new features. However, for compatibility reasons, BIND
retained older ways of doing things even when new ways were added. This
particularly applies to signing and maintaining zones, where different
levels of automation are available.
The following is a list of the available methods of signing in BIND, in the
order that they were introduced - and in order of decreasing
complexity.
Manual
“Manual” signing was the first method to be introduced into BIND and
its name describes it perfectly: the user needs to do everything. In the
more-automated methods, you load an unsigned zone file into
named, which takes care of signing it. With manual signing, you
have to provide a signed zone for named to serve.
In practice, this means creating an unsigned zone file as usual, then
using the BIND-provided tools dnssec-keygen to create the keys
and dnssec-signzone to sign the zone. The signed zone is stored
in another file and is the one you tell BIND to load. To
update the zone (for example, to add a resource record), you update the
unsigned zone, re-sign it, and tell named to load the updated
signed copy. The same goes for refreshing signatures or rolling keys;
the user is responsible for providing the signed zone served by
named. (In the case of rolling keys, you are also responsible for
ensuring that the keys are added and removed at the correct times.)
Why would you want to sign your zone this way? You probably
wouldn’t in the normal course of events, but as there may be
circumstances in which it is required, the scripts have been left in
the BIND distribution.
Semi-Automatic
The first step in DNSSEC automation came with BIND 9.7, when the
auto-dnssec option was added. This causes named to
periodically search the directory holding the key files (see
Generate Keys for a description) and to
use the information in them to both add and remove keys and sign the
zone.
Use of auto-dnssec alone requires that the zone be dynamic,
something not suitable for a number of situations, so BIND 9.9 added the
inline-signing option. With this, named essentially keeps the
signed and unsigned copies of the zone separate. The signed zone is
created from the unsigned one using the key information; when the
unsigned zone is updated and the zone reloaded, named detects the
changes and updates the signed copy of the zone.
This mode of signing has been termed “semi-automatic” in this
document because keys still have to be manually created (and deleted
when appropriate). Although not an onerous task, it is still
additional work.
Why would anyone want to use this
method when fully automated ones are available? At the time of
this writing (mid-2020), the fully automatic methods cannot handle all scenarios,
particularly that of having a single key shared among multiple
zones. They also do not handle keys stored in Hardware Security
Modules (HSMs), which are briefly covered in
Hardware Security Modules (HSMs).
Fully Automatic with dnssec-keymgr
The next step in the automation of DNSSEC operations came with BIND
9.11, which introduced the dnssec-keymgr utility. This is a
separate program and was expected to be run on a regular basis
(probably via cron). It read a DNSSEC policy from its
configuration file and read timing information from the DNSSEC key
files. With this information it created new key files with timing
information in them consistent with the policy. named was run as
usual, picking up the timing information in the key files to
determine when to add and remove keys, and when to sign with them.
In BIND 9.17.0 and later, this method of handling DNSSEC
policies has been replaced by the dnssec-policy statement in the
configuration file.
Introduced a BIND 9.16, dnssec-policy replaces dnssec-keymgr from BIND
9.17 onwards and avoids the need to run a separate program. It also
handles the creation of keys if a zone is added (dnssec-keymgr
requires an initial key) and deletes old key files as they are
removed from the zone. This is the method described in
Easy-Start Guide for Signing Authoritative Zones.
We now look at some of these methods in more detail. We cover
semi-automatic signing first, as that contains a lot of useful
information about keys and key timings. After that, we
touch on fully automatic signing with dnssec-policy. Since this has
already been described in
Easy-Start Guide for Signing Authoritative Zones, we will just
mention a few additional points. Finally, we briefly describe manual signing.
As noted above, the term semi-automatic signing has been used in this
document to indicate the mode of signing enabled by the auto-dnssec
and inline-signing keywords. named signs the zone without any
manual intervention, based purely on the timing information in the
DNSSEC key files. The files, however, must be created manually.
By appropriately setting the key parameters and the timing information
in the key files, you can implement any DNSSEC policy you want for your
zones. But why manipulate the key information yourself rather than rely
on dnssec-policy to do it for you? The answer
is that semi-automatic signing allows you to do things that, at the time of this writing
(mid-2020), are currently not possible with one of the key managers: for
example, the ability to use an HSM to store keys, or the ability to use
the same key for multiple zones.
To convert a traditional
(insecure) DNS zone to a secure one, we need to create various
additional records (DNSKEY, RRSIG, NSEC/NSEC3) and, as with
fully automatic signing, to upload verifiable information (such as a DS
record) to the parent zone to complete the chain of trust.
Note
Again, we assume all configuration files, key
files, and zone files are stored in /etc/bind, and most examples
show commands run
as the root user. This may not be ideal, but the point is not
to distract from what is important here: learning how to sign
a zone. There are many best practices for deploying a more secure
BIND installation, with techniques such as jailed process and
restricted user privileges, but those are not covered
in this document. We trust you, a responsible DNS
administrator, to take the necessary precautions to secure your
system.
For our examples below, we work with the assumption that
there is an existing insecure zone example.com that we are
converting to a secure version. The secure version uses both a KSK
and a ZSK.
This command generates four key files in /etc/bind/keys:
Kexample.com.+013+34371.key
Kexample.com.+013+34371.private
Kexample.com.+013+00472.key
Kexample.com.+013+00472.private
The two files ending in .key are the public keys. These contain the
DNSKEY resource records that appear in the zone. The two files
ending in .private are the private keys, and contain the information
that named actually uses to sign the zone.
Of the two pairs, one is the zone-signing key (ZSK), and one is the
key-signing key (KSK). [7] We can tell which is
which by looking at the file contents (the actual keys are shortened
here for ease of display):
# catKexample.com.+013+34371.key
; This is a zone-signing key, keyid 34371, for example.com.; Created: 20200616104249 (Tue Jun 16 11:42:49 2020); Publish: 20200616104249 (Tue Jun 16 11:42:49 2020); Activate: 20200616104249 (Tue Jun 16 11:42:49 2020)example.com. IN DNSKEY 256 3 13 AwEAAfel66...LqkA7cvn8=# catKexample.com.+013+00472.key
; This is a key-signing key, keyid 472, for example.com.; Created: 20200616104254 (Tue Jun 16 11:42:54 2020); Publish: 20200616104254 (Tue Jun 16 11:42:54 2020); Activate: 20200616104254 (Tue Jun 16 11:42:54 2020)example.com. IN DNSKEY 257 3 13 AwEAAbCR6U...l8xPjokVU=
The first line of each file tells us what type of key it is. Also, by
looking at the actual DNSKEY record, we can tell them apart: 256 is
ZSK, and 257 is KSK.
The name of the file also tells us something
about the contents. See chapter Zone keys for more details.
Make sure that these files are readable by named and that the
.private files are not readable by anyone else.
Alternativelly, the dnssec-keyfromlabel program is used to get a key
pair from a crypto hardware device and build the key files. Its usage is
similar to dnssec-keygen.
You may remember that in the above description of this method, we said
that time information related to rolling keys is stored in the key
files. This is placed there by dnssec-keygen when the file is
created, and it can be modified using dnssec-settime. By default,
only a limited amount of timing information is included in the file, as
illustrated in the examples in the previous section.
All the dates are the same, and are the date and time that
dnssec-keygen created the key. We can use
dnssec-settime to modify the dates. The dates can also be
modified using an editor, but that is likely to be more error-prone than
using dnssec-settime. For example, to publish this key in the
zone on 1 July 2020, use it to sign records for a year starting on 15
July 2020, and remove it from the zone at the end of July 2021, we can
use the following command:
; This is a zone-signing key, keyid 34371, for example.com.
; Created: 20200616104249 (Tue Jun 16 11:42:49 2020)
; Publish: 20200701000000 (Wed Jul  1 01:00:00 2020)
; Activate: 20200715000000 (Wed Jul 15 01:00:00 2020)
; Inactive: 20210715000000 (Thu Jul 15 01:00:00 2021)
; Delete: 20210731000000 (Sat Jul 31 01:00:00 2021)
example.com. IN DNSKEY 256 3 13 AwEAAfel66...LqkA7cvn8=
(The actual key is truncated here to improve readability.)
Below is a complete list of each of the metadata fields, and how each
one affects the signing of your zone:
Created: This records the date on which the key was created. It is
not used in calculations; it is useful simply for documentation
purposes.
Publish: This sets the date on which a key is to be published to the
zone. After that date, the key is included in the zone but is
not used to sign it. This allows validating resolvers to get a
copy of the new key in their cache before there are any resource
records signed with it. By default, if not specified at creation
time, this is set to the current time, meaning the key is
published as soon as named picks it up.
Activate: This sets the date on which the key is to be activated. After
that date, resource records are signed with the key. By default,
if not specified during creation time, this is set to the current
time, meaning the key is used to sign data as soon as named
picks it up.
Revoke: This sets the date on which the key is to be revoked. After that
date, the key is flagged as revoked, although it is still included in the
zone and used to sign it. This is used to notify validating
resolvers that this key is about to be removed or retired from the
zone. (This state is not used in normal day-to-day operations. See
RFC 5011 to understand the circumstances where it may be used.)
Inactive: This sets the date on which the key is to become inactive.
After that date, the key is still included in the zone, but it
is no longer used to sign it. This sets the “expiration” or “retire”
date for a key.
Delete: This sets the date on which the key is to be deleted. After that
date, the key is no longer included in the zone, but it
continues to exist on the file system or key repository.
The publication date is the date the key is introduced into the zone.
Sometime later it is activated and is used to sign resource records.
After a specified period, BIND stops using it to sign records, and at some
other specified later time it is removed from the zone.
Finally, we should note that the dnssec-keygen command supports the
same set of switches so we could have set the dates
when we created the key.
Having created the keys with the appropriate timing information, the
next step is to turn on DNSSEC signing. Below is a very simple
named.conf; in our example environment, this file is
/etc/bind/named.conf.
As described in Uploading Information to the Parent Zone, we
must now upload the new information to the parent zone. The format of the
information and how to generate it is described in
Working With the Parent Zone, although it is important to remember that you must
use the contents of the KSK file that you generated above as part of the
process.
When the DS record is published in the parent zone, your zone is fully
signed.
Finally, follow the steps in How To Test Authoritative Zones
to confirm that a query recognizes the zone as properly signed and
vouched for by the parent zone.
Once the zone is signed, it must be monitored as described
in Maintenance Tasks. However,
as the time approaches for a key roll, you must create the new key. Of
course, it is possible to create keys for the next fifty
years all at once and set the key times appropriately. Whether the
increased risk in having the private key files for future keys available
on disk offsets the overhead of having to remember to create a new key
before a rollover depends on your organization’s security policy.
Since BIND 9.16, key management is fully integrated ingo named.
Managing the signing process and rolling of these keys has been described in
Easy-Start Guide for Signing Authoritative Zones and is not
repeated here. A few points are worth noting, though:
The dnssec-policy statement in the named configuration file
describes all aspects of the DNSSEC policy, including the signing.
Manual signing of a zone was the first method of signing introduced into
BIND and offers, as the name suggests, no automation. The user must
handle everything: create the keys, sign the zone file with them, load
the signed zone, periodically re-sign the zone, and manage key rolls,
including interaction with the parent. A user certainly can do all this,
but why not use one of the automated methods? Nevertheless, it may
be useful for test purposes, so we cover it briefly here.
BIND 9 ships with several tools that are used in
this process, which are explained in more detail below. In all cases,
the -h option prints a full list of parameters. Note that the DNSSEC
tools require the keyset files to be in the working directory or the
directory specified by the -d option.
The first step is to create the keys as described in Generate Keys.
Then, edit the zone file to make sure the proper DNSKEY entries are included.
The public keys should be inserted into the zone file by
including the .key files using $INCLUDE statements.
Finally, use the command dnssec-signzone.
Any keyset files corresponding to secure sub-zones should be
present. The zone signer generates NSEC, NSEC3, and RRSIG
records for the zone, as well as DS for the child zones if
-g is specified. If
-g is not specified, then DS RRsets for the
secure child zones need to be added manually.
By default, all zone keys which have an available private key are used
to generate signatures. The following command signs the zone, assuming
it is in a file called zone.child.example, using manually specified keys:
# cd/etc/bind/keys/example.com/
# dnssec-signzone-t-NINCREMENT-oexample.com-f/etc/bind/db/example.com.signed.db\/etc/bind/db/example.com.dbKexample.com.+013+17694.keyKexample.com.+013+06817.key
Verifying the zone using the following algorithms: ECDSAP256SHA256.Zone fully signed:Algorithm: ECDSAP256SHA256: KSKs: 1 active, 0 stand-by, 0 revoked ZSKs: 1 active, 0 stand-by, 0 revoked/etc/bind/db/example.com.signed.dbSignatures generated: 17Signatures retained: 0Signatures dropped: 0Signatures successfully verified: 0Signatures unsuccessfully verified: 0Signing time in seconds: 0.046Signatures per second: 364.634Runtime in seconds: 0.055
The -o switch explicitly defines the domain name
(example.com in this case), while the -f
switch specifies the output file name. The second line has three parameters:
the unsigned zone name (/etc/bind/db/example.com.db), the ZSK file name,
and the KSK file name. This also generates a plain-text file
/etc/bind/db/example.com.signed.db, which can be manually verified for correctness.
dnssec-signzone also produces keyset and dsset files. These are used
to provide the parent zone administrators with the DNSKEY records (or their
corresponding DS records) that are the secure entry point to the zone.
Finally, named.conf needs to be updated to load the signed version
of the zone, which looks something like this:
zone "example.com" IN {
    type primary;
    file "db/example.com.signed.db";
};
Once the rndcreconfig command is issued, BIND serves a signed
zone. The file dsset-example.com (created by dnssec-signzone
when it signed the example.com zone) contains the DS record for the
zone’s KSK. You will need to pass that to the administrator of the parent
zone, to be placed in the zone.
Since this is a manual process, you will need to re-sign periodically,
as well as every time the zone
data changes. You will also need to manually roll the keys by adding and
removing DNSKEY records (and interacting with the parent) at the
appropriate times.
In this chapter, we cover some basic troubleshooting
techniques, some common DNSSEC symptoms, and their causes and solutions. This
is not a comprehensive “how to troubleshoot any DNS or DNSSEC problem”
guide, because that could easily be an entire book by itself.
The first step in troubleshooting DNS or DNSSEC should be to
determine the query path. Whenever you are working with a DNS-related issue, it is
always a good idea to determine the exact query path to identify the
origin of the problem.
End clients, such as laptop computers or mobile phones, are configured
to talk to a recursive name server, and the recursive name server may in
turn forward requests on to other recursive name servers before arriving at the
authoritative name server. The giveaway is the presence of the
Authoritative Answer (aa) flag in a query response: when present, we know we are talking
to the authoritative server; when missing, we are talking to a recursive
server. The example below shows an answer to a query for
www.example.com without the Authoritative Answer flag:
$ dig @10.53.0.3 www.example.com A

; <<>> DiG 9.16.0 <<>> @10.53.0.3 www.example.com a
; (1 server found)
;; global options: +cmd
;; Got answer:
;; ->>HEADER<<- opcode: QUERY, status: NOERROR, id: 62714
;; flags: qr rd ra ad; QUERY: 1, ANSWER: 1, AUTHORITY: 0, ADDITIONAL: 1

;; OPT PSEUDOSECTION:
; EDNS: version: 0, flags:; udp: 4096
; COOKIE: c823fe302625db5b010000005e722b504d81bb01c2227259 (good)
;; QUESTION SECTION:
;www.example.com.       IN  A

;; ANSWER SECTION:
www.example.com.    60  IN  A   10.1.0.1

;; Query time: 3 msec
;; SERVER: 10.53.0.3#53(10.53.0.3)
;; WHEN: Wed Mar 18 14:08:16 GMT 2020
;; MSG SIZE  rcvd: 88
Not only do we not see the aa flag, we see an ra
flag, which indicates Recursion Available. This indicates that the
server we are talking to (10.53.0.3 in this example) is a recursive name
server: although we were able to get an answer for
www.example.com, we know that the answer came from somewhere else.
If we query the authoritative server directly, we get:
$ dig @10.53.0.2 www.example.com A

; <<>> DiG 9.16.0 <<>> @10.53.0.2 www.example.com a
; (1 server found)
;; global options: +cmd
;; Got answer:
;; ->>HEADER<<- opcode: QUERY, status: NOERROR, id: 39542
;; flags: qr aa rd; QUERY: 1, ANSWER: 1, AUTHORITY: 0, ADDITIONAL: 1
;; WARNING: recursion requested but not available
...
The aa flag tells us that we are now talking to the
authoritative name server for www.example.com, and that this is not a
cached answer it obtained from some other name server; it served this
answer to us right from its own database. In fact,
the Recursion Available (ra) flag is not present, which means this
name server is not configured to perform recursion (at least not for
this client), so it could not have queried another name server to get
cached results.
After determining the query path, it is necessary to
determine whether the problem is actually related to DNSSEC
validation. You can use the dig+cd flag to disable
validation, as described in
How Do I Know I Have a Validation Problem?.
When there is indeed a DNSSEC validation problem, the visible symptoms,
unfortunately, are very limited. With DNSSEC validation enabled, if a
DNS response is not fully validated, it results in a generic
SERVFAIL message, as shown below when querying against a recursive name
server at 192.168.1.7:
Usually, this level of error logging is sufficient.
Debug logging, described in
BIND DNSSEC Debug Logging, gives information on how
to get more details about why DNSSEC validation may have
failed.
A word of caution: before you enable debug logging, be aware that this
may dramatically increase the load on your name servers. Enabling debug
logging is thus not recommended for production servers.
With that said, sometimes it may become necessary to temporarily enable
BIND debug logging to see more details of how and whether DNSSEC is
validating. DNSSEC-related messages are not recorded in syslog by default,
even if query log is enabled; only DNSSEC errors show up in syslog.
The example below shows how to enable debug level 3 (to see full DNSSEC
validation messages) in BIND 9 and have it sent to syslog:
After turning on debug logging and restarting BIND, a large
number of log messages appear in
syslog. The example below shows the log messages as a result of
successfully looking up and validating the domain name ftp.isc.org.
Similar to lame delegation in traditional DNS, security lameness refers to the
condition when the parent zone holds a set of DS records that point to
something that does not exist in the child zone. As a result,
the entire child zone may “disappear,” having been marked as bogus by
validating resolvers.
Below is an example attempting to resolve the A record for a test domain
name www.example.net. From the user’s perspective, as described in
How Do I Know I Have a Validation Problem?, only a SERVFAIL
message is returned. On the validating resolver, we see the
following messages in syslog:
This gives us a hint that it is a broken trust chain issue. Let’s take a
look at the DS records that are published for the zone (with the keys
shortened for ease of display):
Next, we query for the DNSKEY and RRSIG of example.net to see if
there’s anything wrong. Since we are having trouble validating, we
can use the dig+cd option to temporarily disable checking and return
results, even though they do not pass the validation tests. The
dig+multiline option causes dig to print the type, algorithm type,
and key id for DNSKEY records. Again,
some long strings are shortened for ease of display:
Here is the problem: the parent zone is telling the world that
example.net is using the key 14956, but the authoritative server
indicates that it is using keys 27247 and 35328. There are several
potential causes for this mismatch: one possibility is that a malicious
attacker has compromised one side and changed the data. A more likely
scenario is that the DNS administrator for the child zone did not upload
the correct key information to the parent zone.
In DNSSEC, every record comes with at least one RRSIG, and each RRSIG
contains two timestamps: one indicating when it becomes valid, and
one when it expires. If the validating resolver’s current system time does
not fall within the two RRSIG timestamps, error messages
appear in the BIND debug log.
The example below shows a log message when the RRSIG appears to have
expired. This could mean the validating resolver system time is
incorrectly set too far in the future, or the zone administrator has not
kept up with RRSIG maintenance.
The log below shows that the RRSIG validity period has not yet begun. This could mean
the validation resolver’s system time is incorrectly set too far in the past, or
the zone administrator has incorrectly generated signatures for this
domain name.
This is a simple yet common issue. If the key files are present but
unreadable by named for some reason, the syslog returns clear error
messages, as shown below:
However, if no keys are found, the error is not as obvious. Below shows
the syslog messages after executing rndcreload with the key files missing from the key directory:
This happens to look exactly the same as if the keys were present and
readable, and appears to indicate that named loaded the keys and signed the zone. It
even generates the internal (raw) files:
# cd /etc/bind/db# lsexample.com.dbexample.com.db.jbkexample.com.db.signed
If named really loaded the keys and signed the zone, you should see
the following files:
# cd /etc/bind/db# lsexample.com.dbexample.com.db.jbkexample.com.db.signedexample.com.db.signed.jnl
So, unless you see the *.signed.jnl file, your zone has not been
signed.
In most cases, you never need to explicitly configure trust
anchors. named supplies the current root trust anchor and,
with the default setting of dnssec-validation, updates it on the
infrequent occasions when it is changed.
However, in some circumstances you may need to explicitly configure
your own trust anchor. As we saw in the Trust Anchors
section, whenever a DNSKEY is received by the validating resolver, it is
compared to the list of keys the resolver explicitly trusts to see if
further action is needed. If the two keys match, the validating resolver
stops performing further verification and returns the answer(s) as
validated.
But what if the key file on the validating resolver is misconfigured or
missing? Below we show some examples of log messages when things are not
working properly.
First of all, if the key you copied is malformed, BIND does not even
start and you will likely find this error message in syslog:
If the key is a valid base64 string but the key algorithm is incorrect,
or if the wrong key is installed, the first thing you will notice is
that virtually all of your DNS lookups result in SERVFAIL, even when
you are looking up domain names that have not been DNSSEC-enabled. Below
shows an example of querying a recursive server 10.53.0.3:
$ dig @10.53.0.3 www.example.com. A

; <<>> DiG 9.16.0 <<>> @10.53.0.3 www.example.org A +dnssec
; (1 server found)
;; global options: +cmd
;; Got answer:
;; ->>HEADER<<- opcode: QUERY, status: SERVFAIL, id: 29586
;; flags: qr rd ra; QUERY: 1, ANSWER: 0, AUTHORITY: 0, ADDITIONAL: 1

;; OPT PSEUDOSECTION:
; EDNS: version: 0, flags: do; udp: 4096
; COOKIE: ee078fc321fa1367010000005e73a58bf5f205ca47e04bed (good)
;; QUESTION SECTION:
;www.example.org.       IN  A
BIND 9.11 introduced Negative Trust Anchors (NTAs) as a means to
temporarily disable DNSSEC validation for a zone when you know that
the zone’s DNSSEC is misconfigured.
The list of currently configured NTAs can also be examined using
rndc, e.g.:
$ rndc nta -dump
 example.com/_default: expiry 19-Mar-2020 19:57:42.000
The default lifetime of an NTA is one hour, although by default, BIND
polls the zone every five minutes to see if the zone correctly
validates, at which point the NTA automatically expires. Both the
default lifetime and the polling interval may be configured via
named.conf, and the lifetime can be overridden on a per-zone basis
using the -lifetimeduration parameter to rndcnta. Both timer
values have a permitted maximum value of one week.
BIND includes a tool called nsec3hash that runs through the same
steps as a validating resolver, to generate the correct hashed name
based on NSEC3PARAM parameters. The command takes the following
parameters in order: salt, algorithm, iterations, and domain. For
example, if the salt is 1234567890ABCDEF, hash algorithm is 1, and
iteration is 10, to get the NSEC3-hashed name for www.example.com we
would execute a command like this:
Signature Validity Periods and Zone Re-Signing Intervals
In How Are Answers Verified?, we saw that record signatures
have a validity period outside of which they are not valid. This means
that at some point, a signature will no longer be valid and a query for
the associated record will fail DNSSEC validation. But how long should a
signature be valid for?
The maximum value for the validity period should be determined by the impact of a
replay attack: if this is low, the period can be long; if high,
the period should be shorter. There is no “right” value, but periods of
between a few days to a month are common.
Deciding a minimum value is probably an easier task. Should something
fail (e.g., a hidden primary distributing to secondary servers that
actually answer queries), how long will it take before the failure is
noticed, and how long before it is fixed? If you are a large 24x7
operation with operators always on-site, the answer might be less than
an hour. In smaller companies, if the failure occurs
just after everyone has gone home for a long weekend, the answer might
be several days.
Again, there are no “right” values - they depend on your circumstances. The
signature validity period you decide to use should be a value between
the two bounds. At the time of this writing (mid-2020), the default policy used by BIND
sets a value of 14 days.
To keep the zone valid, the signatures must be periodically refreshed
since they expire - i.e., the zone must be periodically
re-signed. The frequency of the re-signing depends on your network’s
individual needs. For example, signing puts a load on your server, so if
the server is very highly loaded, a lower re-signing frequency is better. Another
consideration is the signature lifetime: obviously the intervals between
signings must not be longer than the signature validity period. But if
you have set a signature lifetime close to the minimum (see above), the
signing interval must be much shorter. What would happen if the system
failed just before the zone was re-signed?
Again, there is no single “right” answer; it depends on your circumstances. The
BIND 9 default policy sets the signature refresh interval to 5 days.
How do you prove that something does not exist? This zen-like question
is an interesting one, and in this section we provide an overview
of how DNSSEC solves the problem.
Why is it even important to have authenticated denial of existence in DNS?
Couldn’t we just send back “hey, what you asked for does not exist,”
and somehow generate a digital signature to go with it, proving it
really is from the correct authoritative source? Aside from the technical
challenge of signing something that doesn’t exist, this solution has flaws, one of
which is it gives an attacker a way to create the appearance of denial
of service by replaying this message on the network.
Let’s use a little story, told three different ways, to
illustrate how proof of nonexistence works. In our story, we run a small
company with three employees: Alice, Edward, and Susan. For reasons that
are far too complicated to go into, they don’t have email accounts;
instead, email for them is sent to a single account and a nameless
intern passes the message to them. The intern has access to our private
DNSSEC key to create signatures for their responses.
If we followed the approach of giving back the same answer no matter
what was asked, when people emailed and asked for the message to be
passed to “Bob,” our intern would simply answer “Sorry, that person
doesn’t work here” and sign this message. This answer could be validated
because our intern signed the response with our private DNSSEC key.
However, since the signature doesn’t change, an attacker could record
this message. If the attacker were able to intercept our email, when the next
person emailed asking for the message to be passed to Susan, the attacker
could return the exact same message: “Sorry, that person doesn’t work
here,” with the same signature. Now the attacker has successfully fooled
the sender into thinking that Susan doesn’t work at our company, and
might even be able to convince all senders that no one works at this
company.
To solve this problem, two different solutions were created. We will
look at the first one, NSEC, next.
The NSEC record is used to prove that something does not exist, by
providing the name before it and the name after it. Using our tiny
company example, this would be analogous to someone sending an email for
Bob and our nameless intern responding with with: “I’m sorry, that
person doesn’t work here. The name before the location where ‘Bob’
would be is Alice, and the name after that is Edward.” Let’s say
another email was received for a
non-existent person, this time Oliver; our intern would respond “I’m
sorry, that person doesn’t work here. The name before the location
where ‘Oliver’ would be is Edward,
and the name after that is Susan.” If another sender asked for Todd, the
answer would be: “I’m sorry, that person doesn’t work here. The name
before the location where ‘Todd’ would be is Susan, and there are no
other names after that.”
What if the attacker tried to use the same replay method described
earlier? If someone sent an email for Edward, none of the four answers
would fit. If attacker replied with message #2, “I’m sorry, that person
doesn’t work here. The name before it is Alice, and the name after it is
Edward,” it is obviously false, since “Edward” is in the response; and the same
goes for #3, Edward and Susan. As for #1 and #4, Edward does not fall in
the alphabetical range before Alice or after Susan, so the sender can logically deduce
that it was an incorrect answer.
When BIND signs your zone, the zone data is automatically sorted on
the fly before generating NSEC records, much like how a phone directory
is sorted.
The NSEC record allows for a proof of non-existence for record types. If
you ask a signed zone for a name that exists but for a record type that
doesn’t (for that name), the signed NSEC record returned lists all of
the record types that do exist for the requested domain name.
NSEC records can also be used to show whether a record was generated as
the result of a wildcard expansion. The details of this are not
within the scope of this document, but are described well in
RFC 7129.
Unfortunately, the NSEC solution has a few drawbacks, one of which is
trivial “zone walking.” In our story, a curious person can keep sending emails, and
our nameless, gullible intern keeps divulging information about our
employees. Imagine if the sender first asked: “Is Bob there?” and
received back the names Alice and Edward. Our sender could then email
again: “Is Edwarda there?”, and will get back Edward and Susan. (No,
“Edwarda” is not a real name. However, it is the first name
alphabetically after “Edward” and that is enough to get the intern to reply
with a message telling us the next valid name after Edward.) Repeat the
process enough times and the person sending the emails eventually
learns every name in our company phone directory. For many of you, this
may not be a problem, since the very idea of DNS is similar to a public
phone book: if you don’t want a name to be known publicly, don’t put it
in DNS! Consider using DNS views (split DNS) and only display your
sensitive names to a select audience.
The second potential drawback of NSEC is a bigger zone file and memory consumption;
there is no opt-out mechanism for insecure child zones, so each name
in the zone will get an additional NSEC record and a RRSIG record to go with
it. In practice this is a problem only for parent-zone operators dealing with
mostly insecure child zones, such as com.. To learn more about opt-out,
please see NSEC3 Opt-Out.
NSEC3 adds two additional features that NSEC does not have:
It offers no easy zone enumeration.
It provides a mechanism for the parent zone to exclude insecure
delegations (i.e., delegations to zones that are not signed) from the
proof of non-existence.
Recall that in NSEC we provided a range of
names to prove that something does not exist. But as it turns
out, even disclosing these ranges of names becomes a problem: this made
it very easy for the curious-minded to look at our entire zone. Not
only that, unlike a zone transfer, this “zone walking” is more
resource-intensive. So how do we disclose something without actually disclosing
it?
The answer is actually quite simple: hashing functions, or one-way
hashes. Without going into many details, think of it like a magical meat
grinder. A juicy piece of ribeye steak goes in one end, and out comes a
predictable shape and size of ground meat (hash) with a somewhat unique
pattern. No matter how hard you try, you cannot turn the ground meat
back into the ribeye steak: that’s what we call a one-way hash.
NSEC3 basically runs the names through a one-way hash before giving them
out, so the recipients can verify the non-existence without any
knowledge of the other names in the zone.
So let’s tell our little story for the third time, this
time with NSEC3. In this version, our intern is not given a list of actual
names; he is given a list of “hashed” names. So instead of Alice,
Edward, and Susan, the list he is given reads like this (hashes
shortened for easier reading):
Then, an email is received for Bob again. Our intern takes the name Bob
through a hash function, and the result is L8J2…, so he replies: “I’m
sorry, that person doesn’t work here. The name before that is JKMA…,
and the name after that is NTQ0…”. There, we proved Bob doesn’t exist,
without giving away any names! To put that into proper NSEC3 resource
records, they would look like this (again, hashes shortened for
ease of display):
Just because we employed one-way hash functions does not mean there is
no way for a determined individual to figure out our zone data.
Most names published in the DNS are rarely secret or unpredictable. They are
published to be memorable, used and consumed by humans. They are often recorded
in many other network logs such as email logs, certificate transparency logs,
web page links, intrusion detection systems, malware scanners, email archives,
etc. Many times a simple dictionary of commonly used domain-name prefixes
(www, mail, imap, login, database, etc.) can be used to quickly reveal a large
number of labels within a zone. Additionally, if an adversary really wants to
expend significant CPU resources to mount an offline dictionary attack on a
zone’s NSEC3 chain, they will likely be able to find most of the “guessable”
names despite any level of hashing.
Also, it is still possible to gather all of our NSEC3 records and hashed
names and perform an offline brute-force attack by trying all
possible combinations to figure out what the original name is. In our
meat-grinder analogy, this would be like someone
buying all available cuts of meat and grinding them up at home using
the same model of meat grinder, and comparing the output with the meat
you gave him. It is expensive and time-consuming (especially with
real meat), but like everything else in cryptography, if someone has
enough resources and time, nothing is truly private forever. If you
are concerned about someone performing this type of attack on your
zone data, use some of the special techniques described in RFC 4470.
Before we dive into the details of NSEC3 parametrization, please note:
the defaults should not be changed without a strong justification and a full
understanding of the potential impact. See RFC 9276.
The above NSEC3 examples used four parameters: 1, 0, 0, and
zero-length salt. 1 represents the algorithm, 0 represents the opt-out
flag, 0 represents the number of additional iterations, and - is the
salt. Let’s look at how each one can be configured:
Iterations defines the number of _additional_ times to
apply the algorithm when generating an NSEC3 hash. More iterations
consume more resources for both authoritative servers and validating
resolvers. The considerations here are similar to those seen in
Key Sizes, of security versus resources.
Warning
Do not use values higher than zero. A value of zero provides one round
of SHA-1 hashing and protects from non-determined attackers.
A greater number of additional iterations causes interoperability problems
and opens servers to CPU-exhausting DoS attacks, while providing
only doubtful security benefits.
First things first: For most DNS administrators who do not manage a huge number
of insecure delegations, the NSEC3 opt-out featuere is not relevant. See RFC 9276.
Opt-out allows for blocks of unsigned delegations to be covered by a single NSEC3
record. In other words, use of the opt-out allows large registries to only sign as
many NSEC3 records as there are signed DS or other RRsets in the zone; with
opt-out, unsigned delegations do not require additional NSEC3 records. This
sacrifices the tamper-resistance proof of non-existence offered by NSEC3 in
order to reduce memory and CPU overheads, and decreases the effectiveness of the cache
(RFC 8198).
Why would that ever be desirable? If a significant number of delegations
are not yet securely delegated, meaning they lack DS records and are still
insecure or unsigned, generating DNSSEC records for all their NS records
might consume lots of memory and is not strictly required by the child zones.
This resource-saving typically makes a difference only for huge zones like com..
Imagine that you are the operator of busy top-level domains such as com.,
with millions of insecure delegated domain names.
As of mid-2022, around 3% of all com. zones are signed. Basically,
without opt-out, with 1,000,000 delegations, only 30,000 of which are secure, you
still have to generate NSEC RRsets for the other 970,000 delegations; with
NSEC3 opt-out, you will have saved yourself 970,000 sets of records.
In contrast, for a small zone the difference is operationally negligible
and the drawbacks outweigh the benefits.
If NSEC3 opt-out is truly essential for a zone, the following
configuration can be added to dnssec-policy; for example, to create an
NSEC3 chain using the SHA-1 hash algorithm, with the opt-out flag,
no additional iterations, and no extra salt, use:
Contrary to popular belief, adding salt provides little value.
Each DNS zone is always uniquely salted using the zone name. Operators should
use a zero-length salt value.
The properties of this extra salt are complicated and beyond scope of this
document. For detailed description why the salt in the context of DNSSEC
provides little value please see RFC 9276.
So which is better: NSEC or NSEC3? There is no single right
answer here that fits everyone; it comes down to a given network’s needs or
requirements.
In most cases, NSEC is a good choice for zone administrators. It
relieves the authoritative servers and resolver of the additional cryptographic
operations that NSEC3 requires, and NSEC is comparatively easier to
troubleshoot than NSEC3.
NSEC3 comes with many drawbacks and should be implemented only if zone
enumeration prevention is really needed, or when opt-out provides a
significant reduction in memory and CPU overheads (in other words, with a
huge zone with mostly insecure delegations).
Although DNSSEC
documentation talks about three types of keys, they are all the same
thing - but they have different roles. The roles are:
Zone-Signing Key (ZSK)
This is the key used to sign the zone. It signs all records in the
zone apart from the DNSSEC key-related RRsets: DNSKEY, CDS, and
CDNSKEY.
Key-Signing Key (KSK)
This is the key used to sign the DNSSEC key-related RRsets and is the
key used to link the parent and child zones. The parent zone stores a
digest of the KSK. When a resolver verifies the chain of trust it
checks to see that the DS record in the parent (which holds the
digest of a key) matches a key in the DNSKEY RRset, and that it is
able to use that key to verify the DNSKEY RRset. If it can do
that, the resolver knows that it can trust the DNSKEY resource
records, and so can use one of them to validate the other records in
the zone.
Combined Signing Key (CSK)
A CSK combines the functionality of a ZSK and a KSK. Instead of
having one key for signing the zone and one for linking the parent
and child zones, a CSK is a single key that serves both roles.
It is important to realize the terms ZSK, KSK, and CSK describe how the
keys are used - all these keys are represented by DNSKEY records. The
following examples are the DNSKEY records from a zone signed with a KSK
and ZSK:
$ dig @192.168.1.12 example.com DNSKEY

; <<>> DiG 9.16.0 <<>> @192.168.1.12 example.com dnskey +multiline
; (1 server found)
;; global options: +cmd
;; Got answer:
;; ->>HEADER<<- opcode: QUERY, status: NOERROR, id: 54989
;; flags: qr aa rd; QUERY: 1, ANSWER: 2, AUTHORITY: 0, ADDITIONAL: 1
;; WARNING: recursion requested but not available

;; OPT PSEUDOSECTION:
; EDNS: version: 0, flags:; udp: 4096
; COOKIE: 5258d7ed09db0d76010000005ea1cc8c672d8db27a464e37 (good)
;; QUESTION SECTION:
;example.com.       IN DNSKEY

;; ANSWER SECTION:
example.com.        60 IN DNSKEY 256 3 13 (
                tAeXLtIQ3aVDqqS/1UVRt9AE6/nzfoAuaT1Vy4dYl2CK
                pLNcUJxME1Z//pnGXY+HqDU7Gr5HkJY8V0W3r5fzlw==
                ) ; ZSK; alg = ECDSAP256SHA256 ; key id = 63722
example.com.        60 IN DNSKEY 257 3 13 (
                cxkNegsgubBPXSra5ug2P8rWy63B8jTnS4n0IYSsD9eW
                VhiyQDmdgevKUhfG3SE1wbLChjJc2FAbvSZ1qk03Nw==
                ) ; KSK; alg = ECDSAP256SHA256 ; key id = 42933
… and a zone signed with just a CSK:
$ dig @192.168.1.13 example.com DNSKEY

; <<>> DiG 9.16.0 <<>> @192.168.1.13 example.com dnskey +multiline
; (1 server found)
;; global options: +cmd
;; Got answer:
;; ->>HEADER<<- opcode: QUERY, status: NOERROR, id: 22628
;; flags: qr aa rd; QUERY: 1, ANSWER: 1, AUTHORITY: 0, ADDITIONAL: 1
;; WARNING: recursion requested but not available

;; OPT PSEUDOSECTION:
; EDNS: version: 0, flags:; udp: 4096
; COOKIE: bf19ee914b5df46e010000005ea1cd02b66c06885d274647 (good)
;; QUESTION SECTION:
;example.com.       IN DNSKEY

;; ANSWER SECTION:
example.com.        60 IN DNSKEY 257 3 13 (
                p0XM6AJ68qid2vtOdyGaeH1jnrdk2GhZeVvGzXfP/PNa
                71wGtzR6jdUrTbXo5Z1W5QeeJF4dls4lh4z7DByF5Q==
                ) ; KSK; alg = ECDSAP256SHA256 ; key id = 1231
The only visible difference between the records (apart from the key data
itself) is the value of the flags fields; this is 256
for a ZSK and 257 for a KSK or CSK. Even then, the flags field is only a
hint to the software using it as to the role of the key: zones can be
signed by any key. The fact that a CSK and KSK both have the same flags
emphasizes this. A KSK usually only signs the DNSSEC key-related RRsets
in a zone, whereas a CSK is used to sign all records in the zone.
The original idea of separating the function of the key into a KSK and
ZSK was operational. With a single key, changing it for any reason is
“expensive,” as it requires interaction with the parent zone
(e.g., uploading the key to the parent may require manual interaction
with the organization running that zone). By splitting it, interaction
with the parent is required only if the KSK is changed; the ZSK can be
changed as often as required without involving the parent.
The split also allows the keys to be of different lengths. So the ZSK,
which is used to sign the record in the zone, can be of a (relatively)
short length, lowering the load on the server. The KSK, which is used
only infrequently, can be of a much longer length. The relatively
infrequent use also allows the private part of the key to be stored in a
way that is more secure but that may require more overhead to access, e.g., on
an HSM (see Hardware Security Modules (HSMs)).
In the early days of DNSSEC, the idea of splitting the key went more or
less unchallenged. However, with the advent of more powerful computers
and the introduction of signaling methods between the parent and child
zones (see The CDS and CDNSKEY Resource Records), the advantages of a ZSK/KSK split are
less clear and, for many zones, a single key is all that is required.
As with many questions related to the choice of DNSSEC policy, the
decision on which is “best” is not clear and depends on your circumstances.
There are three algorithm choices for DNSSEC as of this writing
(mid-2020):
RSA
Elliptic Curve DSA (ECDSA)
Edwards Curve Digital Security Algorithm (EdDSA)
All are supported in BIND 9, but only RSA and ECDSA (specifically
RSASHA256 and ECDSAP256SHA256) are mandatory to implement in DNSSEC.
However, RSA is a little long in the tooth, and ECDSA/EdDSA are emerging
as the next new cryptographic standards. In fact, the US federal
government recommended discontinuing RSA use altogether by September 2015
and migrating to using ECDSA or similar algorithms.
For now, use ECDSAP256SHA256 but keep abreast of developments in this
area. For details about rolling over DNSKEYs to a new algorithm, see
Algorithm Rollovers.
If using RSA keys, the choice of key sizes is a classic issue of finding
the balance between performance and security. The larger the key size,
the longer it takes for an attacker to crack the key; but larger keys
also mean more resources are needed both when generating signatures
(authoritative servers) and verifying signatures (recursive servers).
Of the two sets of keys, ZSK is used much more frequently. ZSK is used whenever zone
data changes or when signatures expire, so performance
certainly is of a bigger concern. As for KSK, it is used less
frequently, so performance is less of a factor, but its impact is bigger
because of its role in signing other keys.
In earlier versions of this guide, the following key lengths were
chosen for each set, with the recommendation that they be rotated more
frequently for better security:
ZSK: RSA 1024 bits, rollover every year
KSK: RSA 2048 bits, rollover every five years
These should be considered minimum RSA key sizes. At the time
of this writing (mid-2020), the root zone and many TLDs are already using 2048
bit ZSKs. If you choose to implement larger key sizes, keep in mind that
larger key sizes result in larger DNS responses, which this may mean more
load on network resources. Depending on your network configuration, end users
may even experience resolution failures due to the increased response
sizes, as discussed in What’s EDNS All About (And Why Should I Care)?.
ECDSA key sizes can be much smaller for the same level of security, e.g.,
an ECDSA key length of 224 bits provides the same level of security as a
2048-bit RSA key. Currently BIND 9 sets a key size of 256 for all ECDSA keys.
The beauty of a public key cryptography system is that the public key
portion can and should be distributed to as many people as possible. As
the administrator, you may want to keep the public keys on an easily
accessible file system for operational ease, but there is no need to
securely store them, since both ZSK and KSK public keys are published in
the zone data as DNSKEY resource records.
Additionally, a hash of the KSK public key is also uploaded to the
parent zone (see Working With the Parent Zone for more details),
and is published by the parent zone as DS records.
Ideally, private keys should be stored offline, in secure devices such
as a smart card. Operationally, however, this creates certain
challenges, since the private key is needed to create RRSIG resource
records, and it is a hassle to bring the private key out of
storage every time the zone file changes or signatures expire.
A common approach to strike the balance between security and
practicality is to have two sets of keys: a ZSK set and a KSK set. A ZSK
private key is used to sign zone data, and can be kept online for ease
of use, while a KSK private key is used to sign just the DNSKEY (the ZSK); it is
used less frequently, and can be stored in a much more secure and
restricted fashion.
For example, a KSK private key stored on a USB flash drive that is kept
in a fireproof safe, only brought online once a year to sign a new pair
of ZSKs, combined with a ZSK private key stored on the network
file system and available for routine use, may be a good balance between
operational flexibility and security.
For more information on changing keys, please see
Key Rollovers.
A Hardware Security Module (HSM) may come in different shapes and sizes,
but as the name indicates, it is a physical device or devices, usually
with some or all of the following features:
Tamper-resistant key storage
Strong random-number generation
Hardware for faster cryptographic operations
Most organizations do not incorporate HSMs into their security practices
due to cost and the added operational complexity.
BIND supports Public Key Cryptography Standard #11 (PKCS #11) for
communication with HSMs and other cryptographic support devices. For
more information on how to configure BIND to work with an HSM, please
refer to the BIND 9 Administrator Reference
Manual.
A key rollover is where one key in a zone is replaced by a new one.
There are arguments for and against regularly rolling keys. In essence
these are:
Pros:
Regularly changing the key hinders attempts at determination of the
private part of the key by cryptanalysis of signatures.
It gives administrators practice at changing a key; should a key ever need to be
changed in an emergency, they would not be doing it for the first time.
Cons:
A lot of effort is required to hack a key, and there are probably
easier ways of obtaining it, e.g., by breaking into the systems on
which it is stored.
Rolling the key adds complexity to the system and introduces the
possibility of error. We are more likely to
have an interruption to our service than if we had not rolled it.
Whether and when to roll the key is up to you. How serious would the
damage be if a key were compromised without you knowing about it? How
serious would a key roll failure be?
Before going any further, it is worth noting that if you sign your zone
with either of the fully automatic methods (described in ref:signing_alternative_ways),
you don’t really need to
concern yourself with the details of a key rollover: BIND 9 takes care of
it all for you. If you are doing a manual key roll or are setting up the
keys for a semi-automatic key rollover, you do need to familiarize yourself
with the various steps involved and the timing details.
Rolling a key is not as simple as replacing the DNSKEY statement in the
zone. That is an essential part of it, but timing is everything. For
example, suppose that we run the example.com zone and that a friend
queries for the AAAA record of www.example.com. As part of the
resolution process (described in
How Does DNSSEC Change DNS Lookup?), their recursive server
looks up the keys for the example.com zone and uses them to verify
the signature associated with the AAAA record. We’ll assume that the
records validated successfully, so they can use the
address to visit example.com’s website.
Let’s also assume that immediately after the lookup, we want to roll the ZSK
for example.com. Our first attempt at this is to remove the old
DNSKEY record and signatures, add a new DNSKEY record, and re-sign the
zone with it. So one minute our server is serving the old DNSKEY and
records signed with the old key, and the next minute it is serving the
new key and records signed with it. We’ve achieved our goal - we are
serving a zone signed with the new keys; to check this is really the
case, we booted up our laptop and looked up the AAAA record
ftp.example.com. The lookup succeeded so all must be well. Or is it?
Just to be sure, we called our friend and asked them to check. They
tried to lookup ftp.example.com but got a SERVFAIL response from
their recursive server. What’s going on?
The answer, in a word, is “caching.” When our friend looked up
www.example.com, their recursive server retrieved and cached
not only the AAAA record, but also a lot of other records. It cached
the NS records for com and example.com, as well as
the AAAA (and A) records for those name servers (and this action may, in turn, have
caused the lookup and caching of other NS and AAAA/A records). Most
importantly for this example, it also looked up and cached the DNSKEY
records for the root, com, and example.com zones. When a query
was made for ftp.example.com, the recursive server believed it
already had most of the information
we needed. It knew what nameservers served example.com and their
addresses, so it went directly to one of those to get the AAAA record for
ftp.example.com and its associated signature. But when it tried to
validate the signature, it used the cached copy of the DNSKEY, and that
is when our friend had the problem. Their recursive server had a copy of
the old DNSKEY in its cache, but the AAAA record for ftp.example.com
was signed with the new key. So, not surprisingly, the signature could not
validate.
How should we roll the keys for example.com? A clue to the
answer is to note that the problem came about because the DNSKEY records
were cached by the recursive server. What would have happened had our
friend flushed the DNSKEY records from the recursive server’s cache before
making the query? That would have worked; those records would have been
retrieved from example.com’s nameservers at the same time that we
retrieved the AAAA record for ftp.example.com. Our friend’s server would have
obtained the new key along with the AAAA record and associated signature
created with the new key, and all would have been well.
As it is obviously impossible for us to notify all recursive server
operators to flush our DNSKEY records every time we roll a key, we must
use another solution. That solution is to wait
for the recursive servers to remove old records from caches when they
reach their TTL. How exactly we do this depends on whether we are trying
to roll a ZSK, a KSK, or a CSK.
The ZSK can be rolled in one of the following two ways:
Pre-Publication: Publish the new ZSK into zone data before it is
actually used. Wait at least one TTL interval, so the world’s recursive servers
know about both keys, then stop using the old key and generate a new
RRSIG using the new key. Wait at least another TTL, so the cached old
key data is expunged from the world’s recursive servers, and then remove
the old key.
The benefit of the pre-publication approach is it does not
dramatically increase the zone size; however, the duration of the rollover
is longer. If insufficient time has passed after the new ZSK is
published, some resolvers may only have the old ZSK cached when the
new RRSIG records are published, and validation may fail. This is the
method described in ZSK Rollover.
Double-Signature: Publish the new ZSK and new RRSIG, essentially
doubling the size of the zone. Wait at least one TTL interval, and then remove
the old ZSK and old RRSIG.
The benefit of the double-signature approach is that it is easier to
understand and execute, but it causes a significantly increased zone size
during a rollover event.
Rolling the KSK requires interaction with the parent zone, so
operationally this may be more complex than rolling ZSKs. There are
three methods of rolling the KSK:
Double-KSK: Add the new KSK to the DNSKEY RRset, which is then
signed with both the old and new keys. After waiting for the old RRset
to expire from caches, change the DS record in the parent zone.
After waiting a further TTL interval for this change to be reflected in
caches, remove the old key from the RRset.
Basically, the new KSK is added first at the child zone and
used to sign the DNSKEY; then the DS record is changed, followed by the
removal of the old KSK. Double-KSK keeps the interaction with the
parent zone to a minimum, but for the duration of the rollover, the
size of the DNSKEY RRset is increased.
Double-DS: Publish the new DS record. After waiting for this
change to propagate into caches, change the KSK. After a further TTL
interval during which the old DNSKEY RRset expires from caches, remove the
old DS record.
Double-DS is the reverse of Double-KSK: the new DS is published at
the parent first, then the KSK at the child is updated, then
the old DS at the parent is removed. The benefit is that the size of the DNSKEY
RRset is kept to a minimum, but interactions with the parent zone are
increased to two events. This is the method described in
KSK Rollover.
Double-RRset: Add the new KSK to the DNSKEY RRset, which is
then signed with both the old and new key, and add the new DS record
to the parent zone. After waiting a suitable interval for the
old DS and DNSKEY RRsets to expire from caches, remove the old DNSKEY and
old DS record.
Double-RRset is the fastest way to roll the KSK (i.e., it has the shortest rollover
time), but has the drawbacks of both of the other methods: a larger
DNSKEY RRset and two interactions with the parent.
Rolling the CSK is more complex than rolling either the ZSK or KSK, as
the timing constraints relating to both the parent zone and the caching
of records by downstream recursive servers must be taken into
account. There are numerous possible methods that are a combination of ZSK
rollover and KSK rollover methods. BIND 9 automatic signing uses a
combination of ZSK Pre-Publication and Double-KSK rollover.
Keys are generally rolled on a regular schedule - if you choose
to roll them at all. But sometimes, you may have to rollover keys
out-of-schedule due to a security incident. The aim of an emergency
rollover is to re-sign the zone with a new key as soon as possible, because
when a key is suspected of being compromised, a malicious attacker (or
anyone who has access to the key) could impersonate your server and trick other
validating resolvers into believing that they are receiving authentic,
validated answers.
During an emergency rollover, follow the same operational
procedures described in Rollovers, with the added
task of reducing the TTL of the current active (potentially compromised) DNSKEY
RRset, in an attempt to phase out the compromised key faster before the new
key takes effect. The time frame should be significantly reduced from
the 30-days-apart example, since you probably do not want to wait up to
60 days for the compromised key to be removed from your zone.
Another method is to carry a spare key with you at all times. If
you have a second key pre-published and that one
is not compromised at the same time as the first key,
you could save yourself some time by immediately
activating the spare key if the active
key is compromised. With pre-publication, all validating resolvers should already
have this spare key cached, thus saving you some time.
With a KSK emergency rollover, you also need to consider factors
related to your parent zone, such as how quickly they can remove the old
DS records and publish the new ones.
As with many other facets of DNSSEC, there are multiple aspects to take into
account when it comes to emergency key rollovers. For more in-depth
considerations, please check out RFC 7583.
From time to time, new digital signature algorithms with improved
security are introduced, and it may be desirable for administrators to
roll over DNSKEYs to a new algorithm, e.g., from RSASHA1 (algorithm 5 or
7) to RSASHA256 (algorithm 8). The algorithm rollover steps must be followed with
care to avoid breaking DNSSEC validation.
If you are managing DNSSEC by using the dnssec-policy configuration,
named handles the rollover for you. Simply change the algorithm
for the relevant keys, and named uses the new algorithm when the
key is next rolled. It performs a smooth transition to the new
algorithm, ensuring that the zone remains valid throughout rollover.
If you are using other methods to sign the zone, the administrator needs to do more work. As
with other key rollovers, when the zone is a primary zone, an algorithm
rollover can be accomplished using dynamic updates or automatic key
rollovers. For secondary zones, only automatic key rollovers are
possible, but the dnssec-settime utility can be used to control the
timing.
In any case, the first step is to put DNSKEYs in place using the new algorithm.
You must generate the K* files for the new algorithm and put
them in the zone’s key directory, where named can access them. Take
care to set appropriate ownership and permissions on the keys. If the
auto-dnssec zone option is set to maintain, named
automatically signs the zone with the new keys, based on their timing
metadata when the dnssec-loadkeys-interval elapses or when you issue the
rndcloadkeys command. Otherwise, for primary zones, you can use
nsupdate to add the new DNSKEYs to the zone; this causes named
to use them to sign the zone. For secondary zones, e.g., on a
“bump in the wire” signing server, nsupdate cannot be used.
Once the zone has been signed by the new DNSKEYs (and you have waited
for at least one TTL period), you must inform the parent zone and any trust
anchor repositories of the new KSKs, e.g., you might place DS records in
the parent zone through your DNS registrar’s website.
Before starting to remove the old algorithm from a zone, you must allow
the maximum TTL on its DS records in the parent zone to expire. This
assures that any subsequent queries retrieve the new DS records
for the new algorithm. After the TTL has expired, you can remove the DS
records for the old algorithm from the parent zone and any trust anchor
repositories. You must then allow another maximum TTL interval to elapse
so that the old DS records disappear from all resolver caches.
The next step is to remove the DNSKEYs using the old algorithm from your
zone. Again this can be accomplished using nsupdate to delete the
old DNSKEYs (for primary zones only) or by automatic key rollover when
auto-dnssec is set to maintain. You can cause the automatic key
rollover to take place immediately by using the dnssec-settime
utility to set the Delete date on all keys to any time in the past.
(See the dnssec-settime-Ddate/offset option.)
After adjusting the timing metadata, the rndcloadkeys command
causes named to remove the DNSKEYs and
RRSIGs for the old algorithm from the zone. Note also that with the
nsupdate method, removing the DNSKEYs also causes named to
remove the associated RRSIGs automatically.
Once you have verified that the old DNSKEYs and RRSIGs have been removed
from the zone, the final (optional) step is to remove the key files for
the old algorithm from the key directory.
Dynamic DNS (DDNS) is actually independent of DNSSEC. DDNS provides a
mechanism, separate from editing the zone file or zone database, to edit DNS
data. Most DNS clients and servers are able to handle dynamic
updates, and DDNS can also be integrated as part of your DHCP
environment.
When you have both DNSSEC and dynamic updates in your environment,
updating zone data works the same way as with traditional (insecure)
DNS: you can use rndcfreeze before editing the zone file, and
rndcthaw when you have finished editing, or you can use the
command nsupdate to add, edit, or remove records like this:
$ nsupdate
> server 192.168.1.13
> update add xyz.example.com. 300 IN A 1.1.1.1
> send
> quit
The examples provided in this guide make named automatically
re-sign the zone whenever its content has changed. If you decide to sign
your own zone file manually, you need to remember to execute the
dnssec-signzone command whenever your zone file has been updated.
As far as system resources and performance are concerned, be mindful that
with a DNSSEC zone that changes frequently, every time the zone
changes your system is executing a series of cryptographic operations
to (re)generate signatures and NSEC or NSEC3 records.
Let’s clarify what we mean: in this section, “private networks” really refers to
a private or internal DNS view. Most DNS products offer the ability to
have different versions of DNS answers, depending on the origin of the
query. This feature is often called “DNS views” or “split DNS,” and is most
commonly implemented as an “internal” versus an “external” setup.
For instance, your organization may have a version of example.com
that is offered to the world, and its names most likely resolve to
publicly reachable IP addresses. You may also have an internal version
of example.com that is only accessible when you are on the company’s
private networks or via a VPN connection. These private networks typically
fall under 10.0.0.0/8, 172.16.0.0/12, or 192.168.0.0/16 for IPv4.
So what if you want to offer DNSSEC for your internal version of
example.com? This can be done: the golden rule is to use the same
key for both the internal and external versions of the zones. This
avoids problems that can occur when machines (e.g., laptops) move
between accessing the internal and external zones, when it is possible
that they may have cached records from the wrong zone.
With your DNS infrastructure secured with DNSSEC, information can
now be stored in DNS and its integrity and authenticity can be proved.
One of the new features that takes advantage of this is the DNS-Based
Authentication of Named Entities, or DANE. This improves security in a
number of ways, including:
The ability to store self-signed X.509 certificates and bypass having to pay a third
party (such as a Certificate Authority) to sign the certificates
(RFC 6698).
Improved security for clients connecting to mail servers (RFC 7672).
A secure way of getting public PGP keys (RFC 7929).
DNSSEC, like many things in this world, is not without its problems.
Below are a few challenges and disadvantages that DNSSEC faces.
Increased, well, everything: With DNSSEC, signed zones are larger,
thus taking up more disk space; for DNSSEC-aware servers, the
additional cryptographic computation usually results in increased
system load; and the network packets are bigger, possibly putting
more strains on the network infrastructure.
Different security considerations: DNSSEC addresses many security
concerns, most notably cache poisoning. But at the same time, it may
introduce a set of different security considerations, such as
amplification attack and zone enumeration through NSEC. These
concerns are still being identified and addressed by the Internet
community.
More complexity: If you have read this far, you have probably already
concluded this yourself. With additional resource records, keys,
signatures, and rotations, DNSSEC adds many more moving pieces on top of
the existing DNS machine. The job of the DNS administrator changes,
as DNS becomes the new secure repository of everything from spam
avoidance to encryption keys, and the amount of work involved to
troubleshoot a DNS-related issue becomes more challenging.
Increased fragility: The increased complexity means more
opportunities for things to go wrong. Before DNSSEC, DNS
was essentially “add something to the zone and forget it.” With DNSSEC,
each new component - re-signing, key rollover, interaction with
parent zone, key management - adds more opportunity for error. It is
entirely possible that a failure to validate a name may come down to
errors on the part of one or more zone operators rather than the
result of a deliberate attack on the DNS.
New maintenance tasks: Even if your new secure DNS infrastructure
runs without any hiccups or security breaches, it still requires
regular attention, from re-signing to key rollovers. While most of
these can be automated, some of the tasks, such as KSK rollover,
remain manual for the time being.
Not enough people are using it today: While it’s estimated (as of
mid-2020) that roughly 30% of the global Internet DNS traffic is
validating, [8] that doesn’t mean that many of
the DNS zones are actually signed. What this means is, even if your
company’s zone is signed today, fewer than 30% of the Internet’s
servers are taking advantage of this extra security. It gets worse:
with less than 1.5% of the com. domains signed, even if your
DNSSEC validation is enabled today, it’s not likely to buy you or
your users a whole lot more protection until these popular domain
names decide to sign their zones.
The last point may have more impact than you realize. Consider this:
HTTP and HTTPS make up the majority of traffic on the Internet. While you may have
secured your DNS infrastructure through DNSSEC, if your web hosting is
outsourced to a third party that does not yet support DNSSEC in its
own domain, or if your web page loads contents and components from
insecure domains, end users may experience validation problems when
trying to access your web page. For example, although you may have signed
the zone company.com, the web address www.company.com may actually be a
CNAME to foo.random-cloud-provider.com. As long as
random-cloud-provider.com remains an insecure DNS zone, users cannot
fully validate everything when they visit your web page and could be
redirected elsewhere by a cache poisoning attack.
There are two recipes here: the first shows an example using DNSSEC
signing on the primary server, which has been covered in this
guide; the second shows how to setup a “bump in the
wire” between a hidden primary and the secondary servers to seamlessly
sign the zone “on the fly.”
In this recipe, our servers are illustrated as shown in
DNSSEC Signing Recipe #1: we have a primary server
(192.168.1.1) and three secondary servers (192.168.1.2, 192.168.1.3, and
192.168.1.4) that receive zone transfers. To get the zone
signed, we need to reconfigure the primary server. Once reconfigured, a
signed version of the zone is generated on the fly;
zone transfers take care of synchronizing the signed zone data
to all secondary name servers, without configuration or software changes
on them.
We have chosen to use the default policy, storing the keys generated for
the zone in the directory keys/example.com. To use a
custom policy, define the policy in the configuration
file and select it in the zone statement (as described in
Creating a Custom DNSSEC Policy).
On the secondary servers, named.conf does not need to be updated,
and it looks like this:
In this recipe, we take advantage of the power of automated signing
by placing an additional name server (192.168.1.5) between the hidden
primary (192.168.1.1) and the DNS secondaries (192.168.1.2, 192.168.1.3,
and 192.168.1.4). The additional name server, 192.168.1.5, acts as a “bump
in the wire,” taking an unsigned zone from the hidden primary,
and sending out signed data on the other end to the secondary name
servers. The steps described in this recipe may be used as part of a
DNSSEC deployment strategy, since it requires only minimal changes made to
the existing hidden DNS primary and DNS secondaries.
It is important to remember that 192.168.1.1 in this case is a hidden
primary not exposed to the world, and it must not be listed in the NS RRset.
Otherwise the world will get conflicting answers: unsigned answers from
the hidden primary and signed answers from the other name servers.
The only configuration change needed on the hidden primary, 192.168.1.1,
is to make sure it allows our middle box to perform a zone transfer:
On the middle box, 192.168.1.5, all the tasks described in
Easy-Start Guide for Signing Authoritative Zones still need to be
performed, such as generating key pairs and uploading information to
the parent zone. This server is configured as secondary to the hidden
primary 192.168.1.1 to receive the unsigned data; then, using keys
accessible to this middle box, to sign data on the fly; and finally, to send out the
signed data via zone transfer to the other three DNS secondaries. Its
named.conf zone statement looks like this:
(As before, the default policy has been selected here. See
Creating a Custom DNSSEC Policy for instructions on how to define
and use a custom policy.)
Finally, on the three secondary servers, the configuration should be updated
to receive a zone transfer from 192.168.1.5 (the middle box) instead of
from 192.168.1.1 (the hidden primary). If using BIND, the named.conf file looks
like this:
zone"example.com"IN{typesecondary;file"db/example.com.db";primaries{192.168.1.5;};# this was 192.168.1.1 before!};
If you are signing your zone using a dnssec-policy statement, this
section is not really relevant to you. In the policy statement, you set how long
you want your keys to be valid for, the time
taken for information to propagate through your zone, the time it takes
for your parent zone to register a new DS record, etc., and that’s more
or less it. named implements everything for you automatically, apart from
uploading the new DS records to your parent zone - which is covered in
Uploading Information to the Parent Zone. (Some
screenshots from a session where a KSK is uploaded to the parent zone
are presented here for convenience.) However, these recipes may be useful
in describing what happens
through the rollover process and what you should be monitoring.
This recipe covers how to perform a ZSK rollover using what is known as
the Pre-Publication method. For other ZSK rolling methods, please see
ZSK Rollover Methods in Advanced Discussions.
Below is a sample timeline for a ZSK rollover to occur on January 1, 2021:
December 1, 2020 (one month before rollover)
Generate new ZSK
Add DNSKEY for new ZSK to zone
January 1, 2021 (day of rollover)
New ZSK used to replace RRSIGs for the bulk of the zone
February 1, 2021 (one month after rollover)
Remove old ZSK DNSKEY RRset from zone
DNSKEY signatures made with KSK are changed
The current active ZSK has the ID 17694 in the example below. For more
information on key management and rollovers, please see
Rollovers.
On December 1, 2020, a month before the example rollover, you (as administrator)
should change the parameters on the current key (17694). Set it to become inactive on
January 1, 2021 and be deleted from the zone on February 1, 2021; also,
generate a successor key (51623):
The first command gets us into the key directory
/etc/bind/keys/example.com/, where keys for example.com are
stored.
The second, dnssec-settime, sets an inactive (-I) date of January 1,
2021, and a deletion (-D) date of February 1, 2021, for the current ZSK
(Kexample.com.+008+17694).
The third command, dnssec-keygen, creates a successor key, using
the exact same parameters (algorithms, key sizes, etc.) as the current
ZSK. The new ZSK created in our example is Kexample.com.+008+51623.
Make sure the successor keys are readable by named.
named’s logging messages indicate when the next
key checking event is scheduled to occur, the frequency of which can be
controlled by dnssec-loadkeys-interval. The log message looks like
this:
And you can check the publish date of the key by looking at the key
file:
# cd /etc/bind/keys/example.com# cat Kexample.com.+008+51623.key;Thisisazone-signingkey,keyid11623,forexample.com.;Created:20201130160024(MonDec100:00:242020);Publish:20201202000000(FriDec208:00:002020);Activate:20210101000000(SunJan108:00:002021)...
Since the publish date is set to the morning of December 2, and our example
scenario takes place on December 1, the next
morning you will notice that your zone has gained a new DNSKEY record,
but the new ZSK is not yet being used to generate signatures. Below is
the abbreviated output - with shortened DNSKEY and RRSIG - when querying the
authoritative name server, 192.168.1.13:
For good measure, let’s take a look at the SOA record and its
signature for this zone. Notice the RRSIG is signed by the current ZSK,
17694. This will come in handy later when you want to verify whether
the new ZSK is in effect:
$ dig @192.168.1.13 example.com. SOA +dnssec +multiline

...
;; ANSWER SECTION:
example.com.        600 IN SOA ns1.example.com. admin.example.com. (
                2020120102 ; serial
                1800       ; refresh (30 minutes)
                900        ; retry (15 minutes)
                2419200    ; expire (4 weeks)
                300        ; minimum (5 minutes)
                )
example.com.        600 IN RRSIG SOA 8 2 600 (
                20201230160109 20201130150109 17694 example.com.
                YUTC8rFULaWbW+nAHzbfGwNqzARHevpryzRIJMvZBYPo
                NAeejNk9saNAoCYKWxGJ0YBc2k+r5fYq1Mg4ll2JkBF5
                buAsAYLw8vEOIxVpXwlArY+oSp9T1w2wfTZ0vhVIxaYX
                6dkcz4I3wbDx2xmG0yngtA6A8lAchERx2EGy0RM= )
These are all the manual tasks you need to perform for a ZSK rollover.
If you have followed the configuration examples in this guide of using
inline-signing and auto-dnssec, everything else is automated for
you by BIND.
On the actual day of the rollover, although there is technically nothing
for you to do, you should still keep an eye on the zone to make sure new
signatures are being generated by the new ZSK (51623 in this example).
The easiest way is to query the authoritative name server 192.168.1.13
for the SOA record as you did a month ago:
As you can see, the signature generated by the old ZSK (17694) has
disappeared, replaced by a new signature generated from the new ZSK
(51623).
Note
Not all signatures will disappear magically on the same day;
it depends on when each one was generated. In the worst-case scenario,
a new signature could have been signed by the old ZSK (17694) moments
before it was deactivated, meaning that the signature could live for almost
30 more days, until just before February 1.
This is why it is important to keep the old ZSK in the
zone and not delete it right away.
Again, technically there is nothing you need to do on this day,
but it doesn’t hurt to verify that the old ZSK (17694) is now completely
gone from your zone. named will not touch
Kexample.com.+008+17694.private and Kexample.com.+008+17694.key
on your file system. Running the same dig command for DNSKEY should
suffice:
Congratulations, the ZSK rollover is complete! As for the actual key
files (the files ending in .key and .private), they may be deleted at this
point, but they do not have to be.
This recipe describes how to perform KSK rollover using the Double-DS
method. For other KSK rolling methods, please see
KSK Rollover Methods in
Advanced Discussions. The registrar used in this
recipe is GoDaddy. Also for this recipe,
we are keeping the number of DS records down to just one per active set
using just SHA-1, for the sake of better clarity, although in practice
most zone operators choose to upload two DS records as shown in
Working With the Parent Zone. For more information on key
management and rollovers,
please see Rollovers.
Below is a sample timeline for a KSK rollover to occur on January 1, 2021:
December 1, 2020 (one month before rollover)
Change timer on the current KSK
Generate new KSK and DS records
Add DNSKEY for the new KSK to zone
Upload new DS records to parent zone
January 1, 2021 (day of rollover)
Use the new KSK to sign all DNSKEY RRsets, which generates new
RRSIGs
Add new RRSIGs to the zone
Remove RRSIG for the old ZSK from zone
Start using the new KSK to sign DNSKEY
February 1, 2021 (one month after rollover)
Remove the old KSK DNSKEY from zone
Remove old DS records from parent zone
The current active KSK has the ID 24828, and this is the DS record that
has already been published by the parent zone:
# dnssec-dsfromkey -a SHA-1 Kexample.com.+007+24828.keyexample.com.INDS2482871D4A33E8DD550A9567B4C4971A34AD6C4B80A6AD3
On December 1, 2020, a month before the planned rollover, you (as
administrator) should
change the parameters on the current key. Set it to become inactive on January
1, 2021, and be deleted from the zone on February 1st, 2021;
also generate a successor key (23550). Finally, generate a new
DS record based on the new key, 23550:
# cd /etc/bind/keys/example.com/# dnssec-settime -I 20210101 -D 20210201 Kexample.com.+007+24828./Kexample.com.+007+24848.key./Kexample.com.+007+24848.private# dnssec-keygen -S Kexample.com.+007+24848Generatingkeypair.......................................................................................++...................................++Kexample.com.+007+23550# dnssec-dsfromkey -a SHA-1 Kexample.com.+007+23550.keyexample.com.INDS235507154FCF030AA1C79C0088FDEC1BD1C37DAA2E70DFB
The first command gets us into the key directory
/etc/bind/keys/example.com/, where keys for example.com are
stored.
The second, dnssec-settime, sets an inactive (-I) date of January 1,
2021, and a deletion (-D) date of February 1, 2021 for the current KSK
(Kexample.com.+007+24848).
The third command, dnssec-keygen, creates a successor key, using
the exact same parameters (algorithms, key sizes, etc.) as the current
KSK. The new key pair created in our example is Kexample.com.+007+23550.
The fourth and final command, dnssec-dsfromkey, creates a DS record
from the new KSK (23550), using SHA-1 as the digest type. Again, in
practice most people generate two DS records for both supported digest
types (SHA-1 and SHA-256), but for our example here we are only using
one to keep the output small and hopefully clearer.
Make sure the successor keys are readable by named.
The syslog message indicates when the next key
checking event is. The log message looks like this:
You can check the publish date of the key by looking at the key
file:
# cd /etc/bind/keys/example.com# cat Kexample.com.+007+23550.key;Thisisakey-signingkey,keyid23550,forexample.com.;Created:20201130160024(ThuDec100:00:242020);Publish:20201202000000(FriDec208:00:002020);Activate:20210101000000(SunJan108:00:002021)...
Since the publish date is set to the morning of December 2, and our example
scenario takes place on December 1, the next
morning you will notice that your zone has gained a new DNSKEY record
based on your new KSK, but with no corresponding RRSIG yet. Below is the
abbreviated output - with shortened DNSKEY and RRSIG - when querying the
authoritative name server, 192.168.1.13:
Anytime after generating the DS record, you can upload it;
it is not necessary to wait for the DNSKEY to be published in your zone,
since this new KSK is not active yet. You can do it
immediately after the new DS record has been generated on December 1,
or you can wait until the next day after you have verified that the
new DNSKEY record is added to the zone. Below are some screenshots from
GoDaddy’s web-based interface, used to add a new DS record.
[9]
After logging in, click the green “Launch” button next to the domain
name you want to manage.
Finally, let’s verify that the registrar has published the new DS
record. This may take anywhere from a few minutes to a few days,
depending on your parent zone. You can verify whether your
parent zone has published the new DS record by querying for the DS
record of your zone. In the example below, the Google public DNS server
8.8.8.8 is used:
You can also query your parent zone’s authoritative name servers
directly to see if these records have been published. DS records will
not show up on your own authoritative zone, so you cannot query your own
name servers for them. In this recipe, the parent zone is .com, so
querying a few of the .com name servers is another appropriate
verification.
If you have followed the examples in this document, as described in
Easy-Start Guide for Signing Authoritative Zones, there is
technically nothing you need to do manually on the actual day of the
rollover. However, you should still keep an eye on the zone to make sure
new signature(s) are being generated by the new KSK (23550 in this
example). The easiest way is to query the authoritative name server
192.168.1.13 for the same DNSKEY and signatures, as you did a month
ago:
While the removal of the old DNSKEY from the zone should be automated by
named, the removal of the DS record is manual. You should make sure
the old DNSKEY record is gone from your zone first, by querying for the
DNSKEY records of the zone; this time we expect not to see
the key with an ID of 24828:
Since the key with the ID 24828 is gone, you can now remove the old DS
record for that key from our parent zone.
Be careful to remove the correct DS record. If you accidentally remove
the new DS record(s) with key ID 23550, it could lead to a problem called
“security lameness,” as discussed in
Security Lameness, and may cause users to be unable
to resolve any names in the zone.
After logging in (again, GoDaddy.com in our example) and launching the domain, scroll down to the “DS
Records” section and click Manage.
Congratulations, the KSK rollover is complete! As for the actual key
files (ending in .key and .private), they may be deleted at this
point, but they do not have to be.
If your zone is signed with RSASHA1 (algorithm 5), you cannot migrate
to NSEC3 without also performing an
algorithm rollover
to RSASHA1-NSEC3-SHA1 (algorithm 7), as described in
Algorithm Rollovers. This
ensures that older validating resolvers that do not understand
NSEC3 will fall back to treating the zone as unsecured (rather than
“bogus”), as described in Section 2 of RFC 5155.
To enable NSEC3, update your dnssec-policy and add the desired NSEC3
parameters. The example below enables NSEC3 for zones with the standard
DNSSEC policy, using 0 additional iterations, no opt-out, and a zero-length salt:
You can also verify that it worked by querying for a name that you know
does not exist, and checking for the presence of the NSEC3 record.
For example:
$ dig @192.168.1.13 thereisnowaythisexists.example.com. A +dnssec +multiline

...
5A03TL362CS8VSIH69CVA4MJIKRHFQH3.example.com. 300 IN NSEC3 1 0 0 - (
                TQ9QBEGA6CROHEOC8KIH1A2C06IVQ5ER
                NS SOA RRSIG DNSKEY NSEC3PARAM )
...
Our example used four parameters: 1, 0, 0, and -, in
order. 1 represents the algorithm, 0 represents the
opt-out flag, 0 represents the number of additional iterations, and
- denotes no salt is used. To learn more about each of these
parameters, please see NSEC3PARAM.
Migrating from NSEC3 back to NSEC is easy; just remove the nsec3param
configuration option from your dnssec-policy and reconfigure the name
server. You can tell that it worked if you see these messages in the log:
This recipe discusses how to enable and disable NSEC3 opt-out, and how to show
the results of each action. As discussed in
NSEC3 Opt-Out, NSEC3 opt-out is a feature
that can help conserve resources on parent zones with many
delegations that have not yet been signed.
Warning
NSEC3 Opt-Out feature brings benefit only to _extremely_ large zones with lots
of insecure delegations. It’s use is counterproductive in all other cases as
it decreases tamper-resistance of the zone and also decreases efficiency of
resolver cache (see RFC 8198).
In other words, don’t enable Opt-Out unless you are serving an equivalent of
com. zone.
Because the NSEC3PARAM record does not keep track of whether opt-out is used,
it is hard to check whether changes need to be made to the NSEC3 chain if the flag
is changed. Similar to changing the NSEC3 salt, your best option is to change
the value of optout together with another NSEC3 parameter, like
iterations, and in a following step restore the iterations value.
For this recipe we assume the zone example.com
has the following four entries (for this example, it is not relevant what
record types these entries are):
ns1.example.com
ftp.example.com
www.example.com
web.example.com
And the zone example.com has five delegations to five subdomains, only one of
which is signed and has a valid DS RRset:
aaa.example.com, not signed
bbb.example.com, signed
ccc.example.com, not signed
ddd.example.com, not signed
eee.example.com, not signed
Before enabling NSEC3 opt-out, the zone example.com contains ten
NSEC3 records; below is the list with the plain text name before the actual
NSEC3 record:
After NSEC3 opt-out is enabled, the number of NSEC3 records is reduced.
Notice that the unsigned delegations aaa, ccc, ddd, and
eee no longer have corresponding NSEC3 records.
NSEC3 hashes the plain text domain name, and we can compute our own
hashes using the tool nsec3hash. For example, to compute the
hashed name for www.example.com using the parameters we listed
above, we can execute this command:
The “insecure” policy is a built-in policy (like “default”). It makes sure
the zone is still DNSSEC-maintained, to allow for a graceful transition to
unsigned. It also publishes the CDS and CDNSKEY DELETE records automatically
at the appropriate time.
If the parent zone allows management of DS records via CDS/CDNSKEY, as described in
RFC 8078, the DS record should be removed from the parent automatically.
Otherwise, DS records can be removed via the registrar. Below is an example
showing how to remove DS records using the
GoDaddy web-based interface:
After logging in, click the green “Launch” button next to the domain
name you want to manage.
When the DS records have been removed from the parent zone, use
rndcdnssec-checkds-keyidwithdrawnexample.com to tell named that
the DS is removed, and the remaining DNSSEC records will be removed in a timely
manner. Or, if parental agents are configured, the DNSSEC records will be
automatically removed after BIND has seen that the parental agents no longer
serve the DS RRset for this zone.
After a while, the zone is reverted back to the traditional, insecure DNS
format. This can be verified by checking that all DNSKEY and RRSIG records have been
removed from the zone.
The dnssec-policy line can then be removed from named.conf and
the zone reloaded. The zone will no longer be subject to any DNSSEC
maintenance.
Below are some common questions and (hopefully) some answers that
help.
Do I need IPv6 to have DNSSEC?
No. DNSSEC can be deployed without IPv6.
Does DNSSEC encrypt my DNS traffic, so others cannot eavesdrop on my DNS queries?
No. Although cryptographic keys and digital signatures
are used in DNSSEC, they only provide authenticity and integrity, not
privacy. Someone who sniffs network traffic can still see all the DNS
queries and answers in plain text; DNSSEC just makes it very difficult
for the eavesdropper to alter or spoof the DNS responses.
For protection against eavesdropping, the preferred protocol is DNS-over-TLS.
DNS-over-HTTPS can also do the job, but it is more complex.
If I deploy DNS-over-TLS/HTTPS, can I skip deploying DNSSEC?
No. DNS-over-encrypted-transport stops eavesdroppers on a network, but it does
not protect against cache poisoning and answer manipulation in other parts
of the DNS resolution chain. In other words, these technologies offer protection
only for records when they are in transit between two machines; any
compromised server can still redirect traffic elsewhere (or simply eavesdrop).
However, DNSSEC provides integrity and authenticity for DNS
records, even when these records are stored in caches and on disks.
Does DNSSEC protect the communication between my laptop and my name server?
Unfortunately, not at the moment. DNSSEC is designed to protect the
communication between end clients (laptop) and name servers;
however, there are few applications or stub resolver libraries as of
mid-2020 that take advantage of this capability.
Does DNSSEC secure zone transfers?
No. You should consider using TSIG to secure zone transfers among your
name servers.
Does DNSSEC protect my network from malicious websites?
DNSSEC makes it much more difficult for attackers to spoof DNS responses
or perform cache poisoning. It cannot protect against users who
visit a malicious website that an attacker owns and operates, or prevent users from
mistyping a domain name; it will just become less likely that an attacker can
hijack other domain names.
In other words, DNSSEC is designed to provide confidence that when
a DNS response is received for www.company.com over port 53, it really came from
Company’s name servers and the answers are authentic. But that does not mean
the web server a user visits over port 80 or port 443 is necessarily safe.
If I enable DNSSEC validation, will it break DNS lookup, since most domain names do not yet use DNSSEC?
No, DNSSEC is backwards-compatible to “standard” DNS. A DNSSEC-enabled
validating resolver can still look up all of these domain names as it always
has under standard DNS.
There are four (4) categories of responses (see RFC 4035):
Domains for which it is not possible to determine whether these domains use DNSSEC.
A DNSSEC-enabled validating resolver still resolves Secure and
Insecure; only Bogus and Indeterminate result in a
SERVFAIL.
As of mid-2022, roughly one-third of users worldwide are using DNSSEC validation
on their recursive name servers. Google public DNS (8.8.8.8) also has
enabled DNSSEC validation.
Do I need to have special client software to use DNSSEC?
No. DNSSEC only changes the communication
behavior among DNS servers, not between a DNS server (validating resolver) and
a client (stub resolver). With DNSSEC validation enabled on your recursive
server, if a domain name does not pass the checks, an error message
(typically SERVFAIL) is returned to clients; to most client
software today, it appears that the DNS query has failed or that the domain
name does not exist.
Since DNSSEC uses public key cryptography, do I need Public Key Infrastructure (PKI) in order to use DNSSEC?
No, DNSSEC does not depend on an existing PKI. Public keys are stored within
the DNS hierarchy; the trustworthiness of each zone is guaranteed by
its parent zone, all the way back to the root zone. A copy of the trust
anchor for the root zone is distributed with BIND 9.
Do I need to purchase SSL certificates from a Certificate Authority (CA) to use DNSSEC?
No. With DNSSEC, you generate and publish your own keys, and sign your own
data as well. There is no need to pay someone else to do it for you.
My parent zone does not support DNSSEC; can I still sign my zone?
Technically, yes, but you will not get
the full benefit of DNSSEC, as other validating resolvers are not
able to validate your zone data. Without the DS record(s) in your parent
zone, other validating resolvers treat your zone as an insecure
(traditional) zone, and no actual verification is carried out.
To the rest of the world, your zone still appears to be
insecure, and it will continue to be insecure until your parent zone can
host the DS record(s) for you and tell the rest of the world
that your zone is signed.
Is DNSSEC the same thing as TSIG?
No. TSIG is typically used
between primary and secondary name servers to secure zone transfers,
while DNSSEC secures DNS lookup by validating answers. Even if you enable
DNSSEC, zone transfers are still not validated; to
secure the communication between your primary and secondary name
servers, consider setting up TSIG or similar secure channels.
How are keys copied from primary to secondary server(s)?
DNSSEC uses public cryptography, which results in two types of keys: public and
private. The public keys are part of the zone data, stored as DNSKEY
record types. Thus the public keys are synchronized from primary to
secondary server(s) as part of the zone transfer. The private keys are
not, and should not be, stored anywhere other than secured on the primary server.
See Key Storage for
more information on key storage options and considerations.
Can I use the same key for multiple zones?
Yes and no. Good security practice
suggests that you should use unique key pairs for each zone, just as
you should have different passwords for your email account, social
media login, and online banking credentials. On a technical level, it
is completely feasible to reuse a key, but multiple zones are at risk if one key
pair is compromised. However, if you have hundreds or thousands
of zones to administer, a single key pair for all might be
less error-prone to manage. You may choose to use the same approach as
with password management: use unique passwords for your bank accounts and
shopping sites, but use a standard password for your not-very-important
logins. First, categorize your zones: high-value zones (or zones that have
specific key rollover requirements) get their own key pairs, while other,
more “generic” zones can use a single key pair for easier management. Note that
at present (mid-2020), fully automatic signing (using the dnssec-policy
clause in your named configuration file) does not support reuse of keys
except when the same zone appears in multiple views (see next question).
To use the same key for multiple zones, sign your
zones using semi-automatic signing. Each zone wishing to use the key
should point to the same key directory.
How do I sign the different instances of a zone that appears in multiple views?
Add a dnssec-policy statement to each zone definition in the
configuration file. To avoid problems when a single computer accesses
different instances of the zone while information is still in its cache
(e.g., a laptop moving from your office to a customer site), you
should sign all instances with the same key. This means setting the
same DNSSEC policy for all instances of the zone, and making sure that the
key directory is the same for all instances of the zone.
Will there be any problems if I change the DNSSEC policy for a zone?
If you are using fully automatic signing, no. Just change the parameters in the
dnssec-policy statement and reload the configuration file. named
makes a smooth transition to the new policy, ensuring that your zone
remains valid at all times.